Building a Real-Time Chat in Your React and Node.js App with Socket.IO

Welcome, fellow developers, to an exciting journey into the world of real-time chat! In today's digital landscape, real-time communication has become an essential component of many web applications. Whether you're building a social networking platform, a collaborative tool, or simply looking to engage your users more effectively, adding real-time chat can be a game-changer.
In this step-by-step guide, we're going to explore how to integrate a robust real-time chat feature into your React and Node.js application using the powerful tool, Socket.IO. By the end of this journey, you'll have the skills and knowledge to create interactive, real-time chat experiences that will captivate your users.
Technologies we would be using
React
Node.js & Express.js
Socket.IO
A good browser
Understanding Real-Time Chat
Before we dive into the technical implementation, it's crucial to grasp the concept of real-time chat and why it's a game-changer for modern web applications.
What is Real-Time Chat?
Real-time chat refers to a form of communication where messages are delivered instantly to recipients as they are sent, creating a conversation that flows seamlessly. Unlike traditional messaging systems, where users need to refresh or manually check for new messages, real-time chat provides an interactive and immediate exchange of information.
WebSockets: The Magic Behind Real-Time
Now that we understand the importance of real-time chat, it's time to uncover the magic that makes it all possible - WebSockets. WebSockets are the secret ingredient behind instantaneous, bidirectional communication in web applications.
The Basics of WebSockets
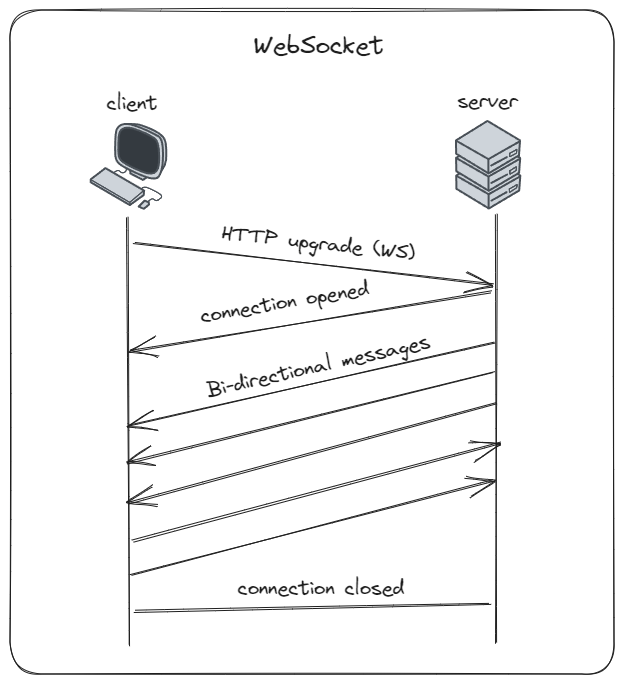
At its core, a WebSocket is a communication protocol that enables real-time, full-duplex communication between a client (usually a web browser) and a server. Let's break down how it works:
Initialization: A WebSocket connection begins with an initial handshake, much like when your web browser connects to a web server. This handshake is done using the HTTP protocol.
Upgrade to WebSocket: After the initial handshake, if both the client and server support WebSockets, the connection is upgraded to a WebSocket connection. This upgrade is crucial because it allows the connection to stay open, enabling continuous, bidirectional communication.
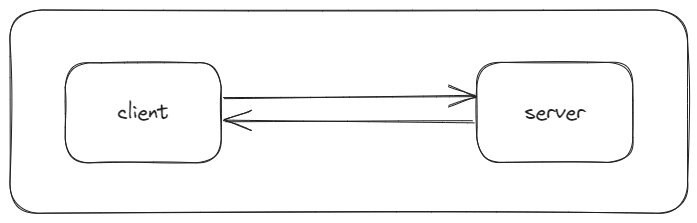
Full-Duplex Communication: Once upgraded, WebSockets facilitate full-duplex communication. In simpler terms, it means both the client and server can send messages to each other simultaneously, without the need for separate requests and responses.
The Advantages of WebSockets
Now that we know how WebSockets work, let's explore why they are a game-changer for real-time applications:
Instant Data Transfer: With WebSockets, data is transmitted and received instantly. There's no need to wait for a response from the server or frequently poll for updates. Messages flow seamlessly, providing a true real-time experience.
Reduced Server Load: In contrast to traditional polling, where clients repeatedly request server updates, WebSockets significantly reduce the server load. The connection remains open, and data is transmitted only when there's new information to convey.
Low Latency: Polling introduces latency because clients must wait for the next poll cycle to receive updates. WebSockets eliminate this latency, ensuring that messages arrive as soon as they're available.
Efficiency and Scalability: WebSockets are efficient, making them ideal for scalable applications. They can handle thousands of concurrent connections without putting an excessive burden on server resources.
In your real-time chat application, WebSockets serve as the foundation for instant message delivery. Instead of making continuous HTTP requests to check for new messages, your clients establish WebSocket connections, guaranteeing that messages are delivered in real time.
With a solid understanding of WebSockets, we are now well-prepared to dive into Socket.IO, a library that simplifies WebSocket implementation in your React and Node.js application. Let's continue our journey to building real-time chat! 🌟
Leveraging Socket.IO
Now that we've grasped the importance of WebSockets as the foundation for real-time communication, let's dive into the tool that simplifies WebSocket implementation in your React and Node.js application - Socket.IO.
What is Socket.IO?
Socket.IO is a JavaScript library that provides an elegant and straightforward way to implement real-time, bidirectional communication between a client and a server. It builds upon the WebSocket protocol while abstracting away many of the complexities, making it easier for developers to create real-time applications.
Key Features of Socket.IO
Here are some key features that make Socket.IO an excellent choice for real-time communication:
Cross-Browser Compatibility: Socket.IO ensures compatibility across various browsers, allowing you to reach a wide range of users without worrying about compatibility issues.
Auto-Reconnect: It handles reconnection automatically if the connection between the client and server is interrupted, ensuring a seamless real-time experience even in less stable network conditions.
Rooms and Namespaces: Socket.IO allows you to organize clients into rooms and namespaces, making it easy to create private chat rooms or group communications within your application.
Custom Events: You can define and emit custom events using Socket.IO, enabling you to send and receive various types of data beyond simple text messages.
Error Handling: Socket.IO provides robust error handling, helping you identify and address issues in real-time communication.
Understanding Socket.IO Events and Methods
In our quest to build a real-time chat application, it's essential to understand the key Socket.IO events and methods that power the communication between the server and clients. Socket.IO simplifies real-time communication by providing a straightforward interface for handling WebSocket connections. Let's explore some of the most commonly used events and methods:
io.on("connection", (socket) => {...}):This event is triggered when a new client connects to the server via WebSocket.
It allows you to set up event listeners and logic for that specific socket connection.
For instance, you can listen for messages from this socket and broadcast them to other connected clients.
socket.emit("event", data):This method sends an event with data to the client associated with the
socket.It's useful for sending specific messages or events to a particular client.
io.emit("event", data):This method broadcasts an event with data to all connected clients.
It's commonly used for sending messages or notifications to all clients in a chat room.
socket.to("room").emit("event", data):This method sends an event with data to all clients in a specific room.
It's useful for creating private chat rooms or groups where messages are only visible to room members.
socket.join("room"):This method adds the socket to a specific room.
It's used to organize clients into rooms for group chat or private messaging.
socket.leave("room"):This method removes the socket from a specific room.
It's used when a client leaves a chat room or group.
socket.on("event", (data) => {...}):This event is used to listen for a specific event from the client.
When the client emits an event with the same name, the server can execute the provided callback function and handle the data.
socket.broadcast.emit("event", data):This method broadcasts an event with data to all clients except the sender (
socket).It's often used to notify other clients about actions taken by one client, like a user joining or leaving a chat.
socket.on("disconnect", () => {...}):This event is triggered when a client disconnects from the server.
It's used to perform cleanup or update the application state when a user leaves.
These events and methods are the building blocks of real-time communication in a Socket.IO-based chat application. By strategically using them, you can create a dynamic and interactive chat experience that keeps your users engaged and connected in real-time.
Alright, good going 🚀
Building the Real-Time Chat with React and Node.js
Now that we've gained an understanding of WebSockets and Socket.IO, it's time to roll up our sleeves and start building the real-time chat feature in your React and Node.js application. This is where the magic happens, and your application begins to transform into an interactive and dynamic platform for real-time communication.
chat-app/
│
├── client/                    (Frontend directory)
│   ├── public/                (Public assets)
│   ├── src/
│   │   ├── components/        (React components)
│   │   │   ├── Chat.jsx       (Chat component)
│   │   │   └── ...            (Other components)
│   │   ├── App.jsx             (Main React application)
│   │   ├── index.jsx           (React application entry point)
│   │   └── ...
│   ├── package.json           (Frontend dependencies and scripts)
│   └── ...
│
├── server/                    (Backend directory)
│   ├── package.json           (Backend dependencies and scripts)
│   ├── server.js              (Express application setup)
├── README.md                 (Project documentation)
Setting Up Your React Frontend
Before we dive into the server-side implementation of our real-time chat, let's ensure that your React frontend is set up and ready to handle this exciting new feature. If you haven't already created a React application, follow the steps below to get started:
Create a New React Application
To create a new React application, you can use the create vite@latest command-line tool, which simplifies the setup process. Open your terminal and run the following command:
npm create vite@latest client
Navigate to Your Project Directory
Once the project is created, navigate to the project directory using the following command:
cd client
Install Additional Dependencies
Next, you'll need to install the necessary dependencies for real-time chat and styling. In your project directory, run the following command to install Socket.IO for WebSocket communication:
npm install socket.io-client
Additionally, let's install Tailwind CSS for styling:
Setting up Tailwind CSS in a Vite project guide - https://tailwindcss.com/docs/guides/vite
Set Up Your Chat Component
Now that your React application is set up and dependencies are installed, you can create a chat component. In the src directory of your project, create components directory in that create a new file called Chat.js where you'll implement your chat interface.
Here's a simple starter code for Chat.jsx:
// Chat.jsx

import React, { useState, useEffect } from 'react';
import io from 'socket.io-client';

const socket = io('http://localhost:5000'); // Replace with your server address

function Chat() {
  // State and event handlers for handling messages

  useEffect(() => {
    // Socket.IO event listeners

    return () => {
      // Cleanup on component unmount
    };
  }, []);

  // JSX for rendering chat interface

  return (
    // Your chat interface JSX
  );
}

export default Chat;
Implementing Real-Time Messaging with Node.js
Now, let's shift our focus to the server side (Node.js) where we'll harness the power of WebSockets and Socket.IO to enable real-time messaging. The following is a simplified example to get you started:
Setting Up the Node.js Server
Before we start, ensure you have Node.js installed on your system. If you haven't already set up a Node.js project for your application, you can initialize one using npm init -y in server directory. Once your are in server directory is set up, we can proceed.
First, let's install the necessary dependencies, including Express.js and Socket.IO, by running the following command in your project directory:
npm install express socket.io
Now, let's create your Node.js server. Create a file (e.g., server.js) and add the following code:
// server.js

const express = require("express");
const http = require("http");
const { Server } = require("socket.io");

const app = express();
const server = http.createServer(app);
const io = new Server(server, {
  cors: {
    origin: "*",
    credentials: true,
  },
});

// Handle WebSocket connections here

server.listen(5000, () => {
  console.log('Server is running on port 5000');
});
This code sets up an Express.js application, creates an HTTP server, and initializes Socket.IO. We're now ready to handle WebSocket connections and real-time messaging.
Handling WebSocket Connections
WebSocket connections are the lifeblood of your real-time chat. When a client (your React frontend) connects to your server, it initiates a WebSocket connection. Let's handle that connection and message broadcasting:
// Handle WebSocket connections here
io.on("connection", (socket) => {
  console.log("A new user has connected", socket.id);

  // Listen for incoming messages from clients
  socket.on("message", (message) => {
    // Broadcast the message to all connected clients
    io.emit("message", message);
  });

  // Handle disconnections
  socket.on("disconnect", () => {
    console.log(socket.id, " disconnected");
  });
});
Here's what's happening:
When a client connects (
io.on('connection', ...), we log their presence.We listen for incoming
messageevents from clients. When a message is received, we broadcast it to all connected clients (io.emit('message', message)). This ensures that every client in the chat room receives the message in real-time.We also listen for the
disconnectevent to handle user disconnections and log them.
Complete server.js code:
// server.js

const express = require("express");
const http = require("http");
const { Server } = require("socket.io");

const app = express();
const server = http.createServer(app);
const io = new Server(server, {
  cors: {
    origin: "*",
    credentials: true,
  },
});

// Handle WebSocket connections here
io.on("connection", (socket) => {
  console.log("A new user has connected", socket.id);

  // Listen for incoming messages from clients
  socket.on("message", (message) => {
    // Broadcast the message to all connected clients
    io.emit("message", message);
  });

  // Handle disconnections
  socket.on("disconnect", () => {
    console.log(socket.id, " disconnected");
  });
});

server.listen(5000, () => {
  console.log("Server is running on port 5000");
});
With this server-side logic in place, your Node.js server is now equipped to handle real-time messaging. Messages sent by one user will be instantly shared with all other connected users, creating a seamless and interactive chat experience.
Cool 😎
Good job, lets move further and code our front-end part
Complete Chat.jsx code:
// Chat.jsx

import { useState, useEffect } from "react";
import io from "socket.io-client";

const socket = io("http://localhost:5000"); // Replace with your server address

function Chat() {
  const [messages, setMessages] = useState([]);
  const [messageInput, setMessageInput] = useState("");

  useEffect(() => {
    // Socket.IO event listeners

    // Listen for incoming messages
    socket.on("message", (message) => {
      setMessages([...messages, message]);
    });

    return () => {
      // Cleanup on component unmount
      socket.off("message");
    };
  }, [messages]);

  const sendMessage = () => {
    if (messageInput.trim() !== "") {
      const message = { text: messageInput, timestamp: new Date() };
      socket.emit("message", message);
      setMessageInput("");
    }
  };

  return (
    <div className="flex justify-center items-center w-full h-screen bg-gradient-to-b from-blue-300 to-blue-200">
      <div className="bg-white rounded-lg w-96 h-96 p-4 shadow-md">
        <div className="flex flex-col h-full">
          <div className="flex-1 p-2 overflow-y-auto bg-gray-100 rounded-md">
            {messages.map((msg, index) => (
              <div key={index} className="flex flex-col items-start">
                <div
                  className="bg-blue-500
                   text-white p-2 rounded-md"
                >
                  {msg.text}
                </div>
                <span className="text-gray-500 text-xs">
                  {new Date(msg.timestamp).toLocaleTimeString()}
                </span>
              </div>
            ))}
          </div>
          <div className="p-2 border-t border-gray-300">
            <div className="flex">
              <input
                type="text"
                className="w-full px-2 py-1 border rounded-l-md outline-none"
                placeholder="Type your message..."
                value={messageInput}
                onChange={(e) => setMessageInput(e.target.value)}
              />
              <button
                className="px-4 py-2 bg-blue-500 text-white rounded-r-md hover:bg-blue-600"
                onClick={sendMessage}
              >
                Send
              </button>
            </div>
          </div>
        </div>
      </div>
    </div>
  );
}

export default Chat;
Socket Initialization:
const socket = io("http://localhost:5000"); // Replace with your server address
This line initializes a Socket.IO connection to the server at the specified address, establishing a real-time communication channel. This connection enables the client to send and receive events to and from the server.
Within the
useEffecthook, we set up an event listener for the"message"event emitted by the server. This event is crucial for receiving incoming chat messages in real-time.When the server emits a
"message"event (typically when a user sends a chat message), the provided callback function is executed. This function adds the received message to themessagesstate, effectively updating the chat interface with the new message.The
useEffectalso returns a cleanup function usingsocket.off("message"). This function ensures that the event listener is removed when the component unmounts, preventing memory leaks and potential issues.The
sendMessagefunction is responsible for sending user messages to the server. It first checks if themessageInput(the user's typed message) is not empty.If a message is not empty, it creates a message object containing the message text and a timestamp.
The
socket.emit("message", message)line sends this message object to the server using the"message"event. This event is handled on the server to broadcast the message to all connected clients.
To start the frontend and backend code for your real-time chat application, follow these steps:
Starting the Frontend (Client) Code:
Open terminal
Navigate to your project's
clientdirectory:cd clientStart the frontend development server:
npm run devThis will compile your React application and open it in a web browser. By default, it should be accessible at http://localhost:5173. You can access this address in your web browser to interact with the frontend of your chat application.
Starting the Backend (Server) Code:
Open another terminal (you should have two terminals open).
Navigate to your project's
serverdirectory:cd serverStart the backend server:
npm run devThis will start your Node.js server, which will listen for incoming WebSocket connections from the frontend and handle real-time messaging functionality.
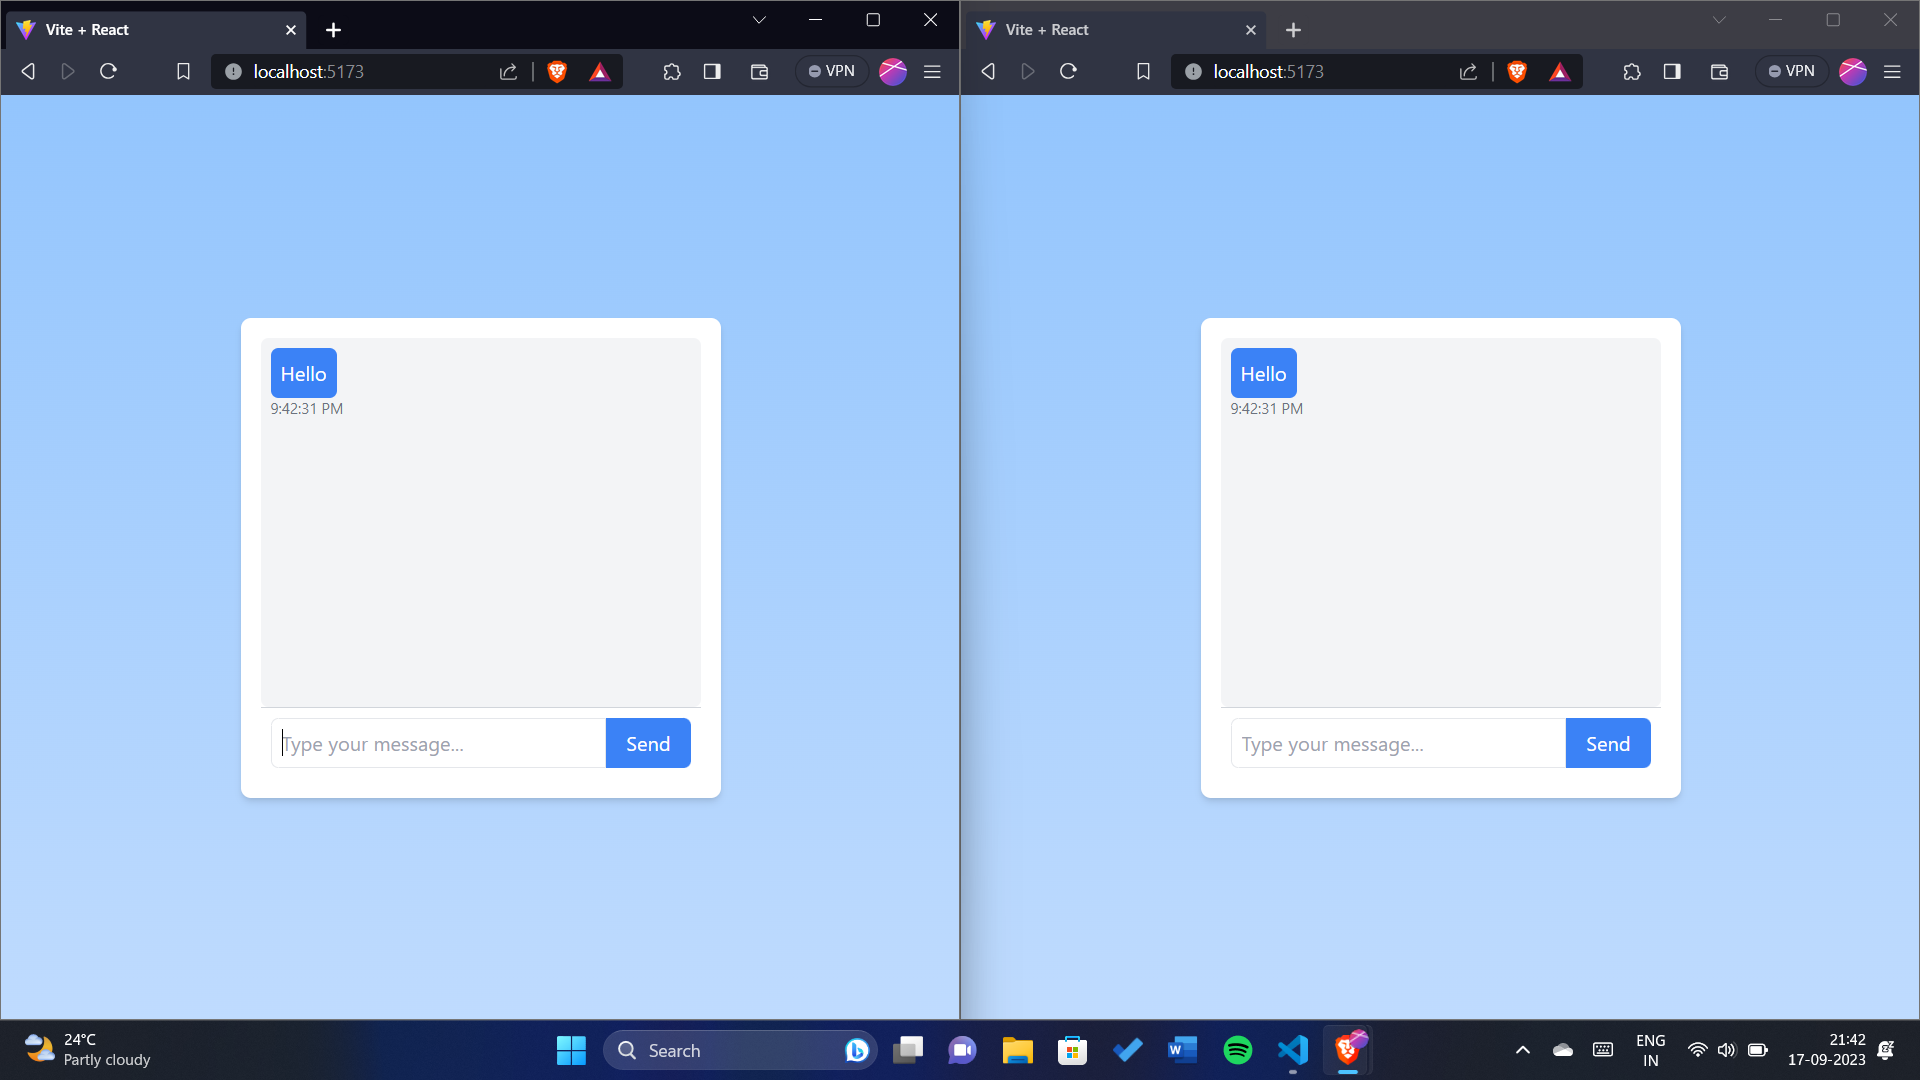
With both the frontend and backend servers running, you should have a fully functioning real-time chat application. Users can access the frontend through a web browser, and they will be able to send and receive real-time messages using Socket.IO.
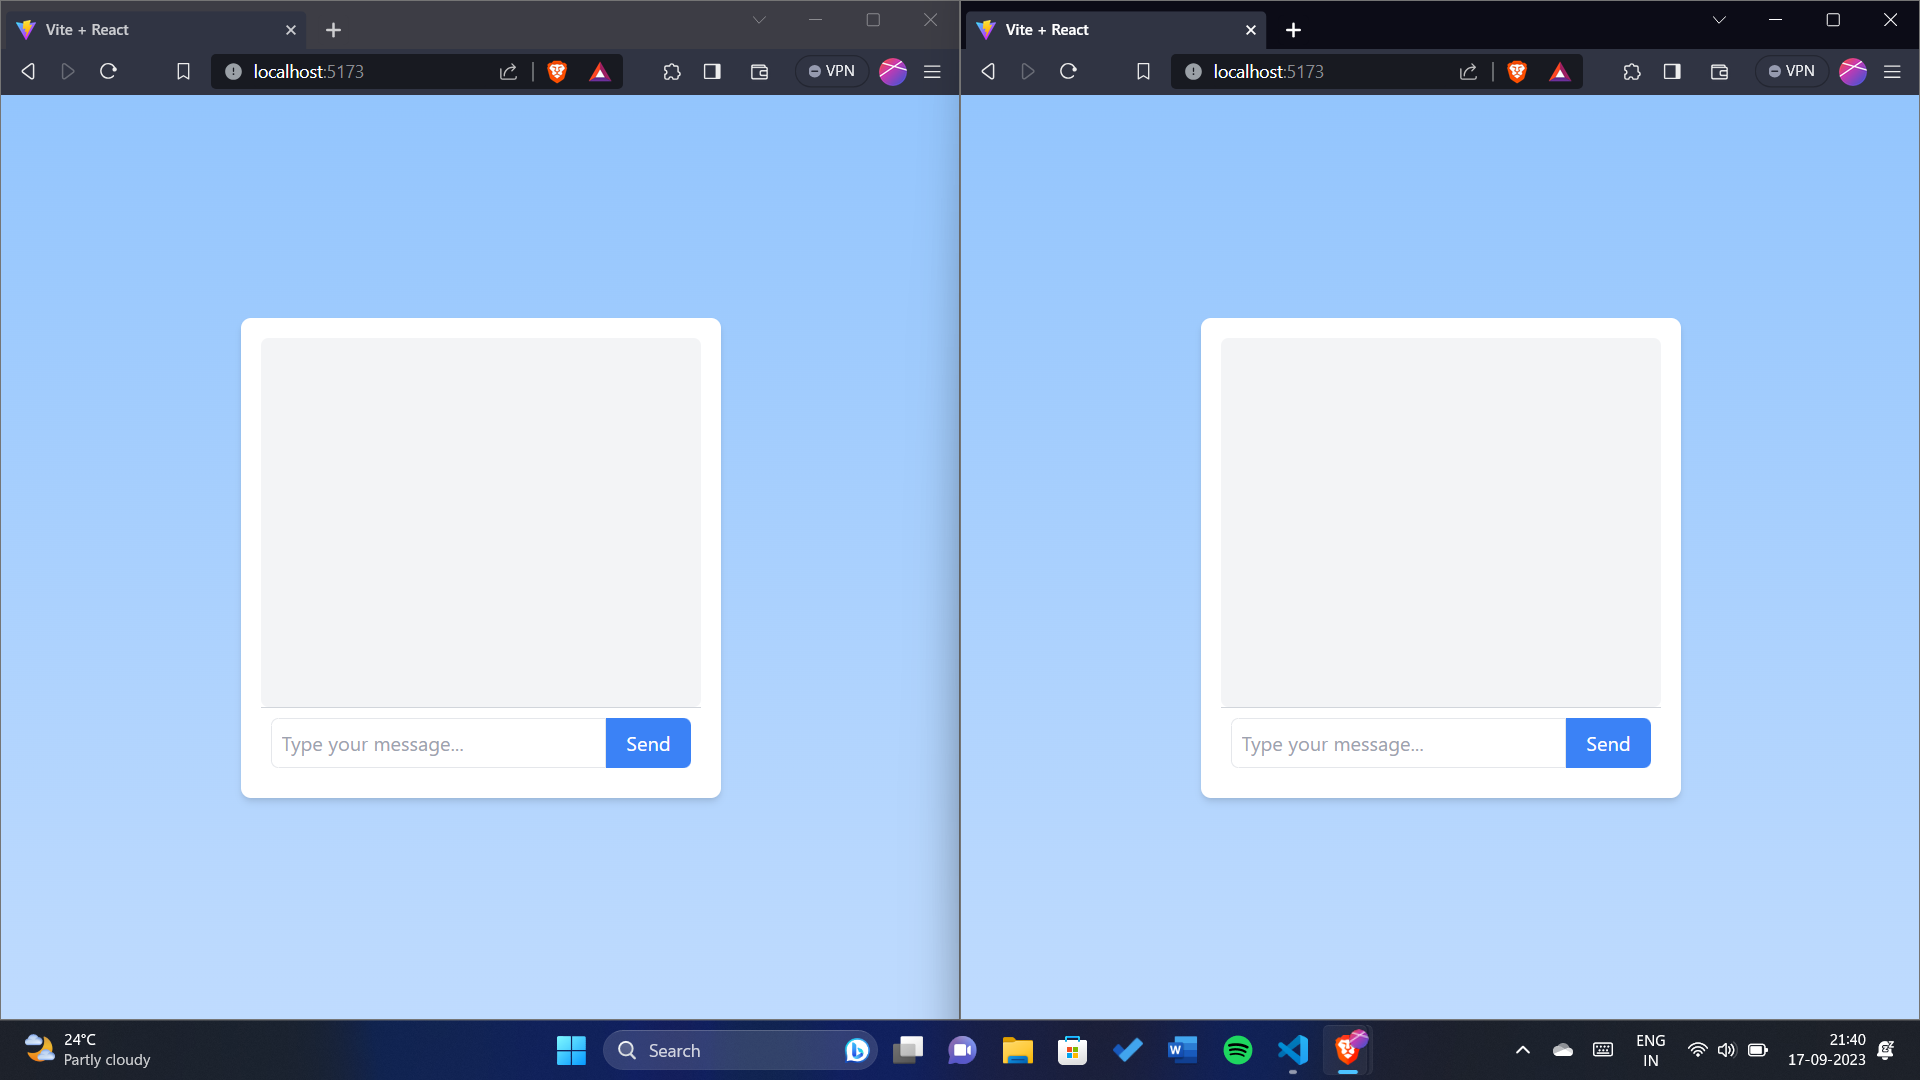
As you can see, I have opened http://localhost:5173 on two different tabs.

Conclusion
By following this guide, you've gained the skills and knowledge necessary to create dynamic and interactive real-time chat features in your web applications. Real-time chat is a powerful tool that can enhance user engagement, collaboration, and the overall user experience. Now, armed with Socket.IO and WebSockets, you're well-prepared to implement real-time features that will captivate your users and take your applications to the next level. Happy coding! 🚀
For a detailed reference and access to the complete code implementation, you can visit here https://github.com/shaikahmadnawaz/chat-app. The repository contains both the backend and frontend code, providing a comprehensive view of the entire project.
And don't forget to connect with me on social media to stay updated with the latest tips, tutorials, and guides:
LinkedIn: shaikahmadnawaz
Twitter: shaikahmadnawaz
GitHub: shaikahmadnawaz


