Simplified Security with Access and Refresh Tokens in Node.js

Hey there! Ever wondered how websites keep your information safe when you log in? That's where access and refresh tokens come into play. They're like secret keys that make sure only you get into your account, and they even have a cool way of staying active without bothering you.
In this blog, we're going to make sense of these tokens, and we'll do it using Node.js. No need for complicated jargon; we'll keep it simple and fun. Ready to dive into the world of secure logins and keys? Let's get started!
Requirements for this Guide
To smoothly navigate through this walkthrough, you'll need:
Basic Node.js and Express.js Knowledge
Basic Knowledge of Mongoose ODM and MongoDB
Basic Knowledge of JSON Web Tokens (JWT)
Understanding Access and Refresh Tokens
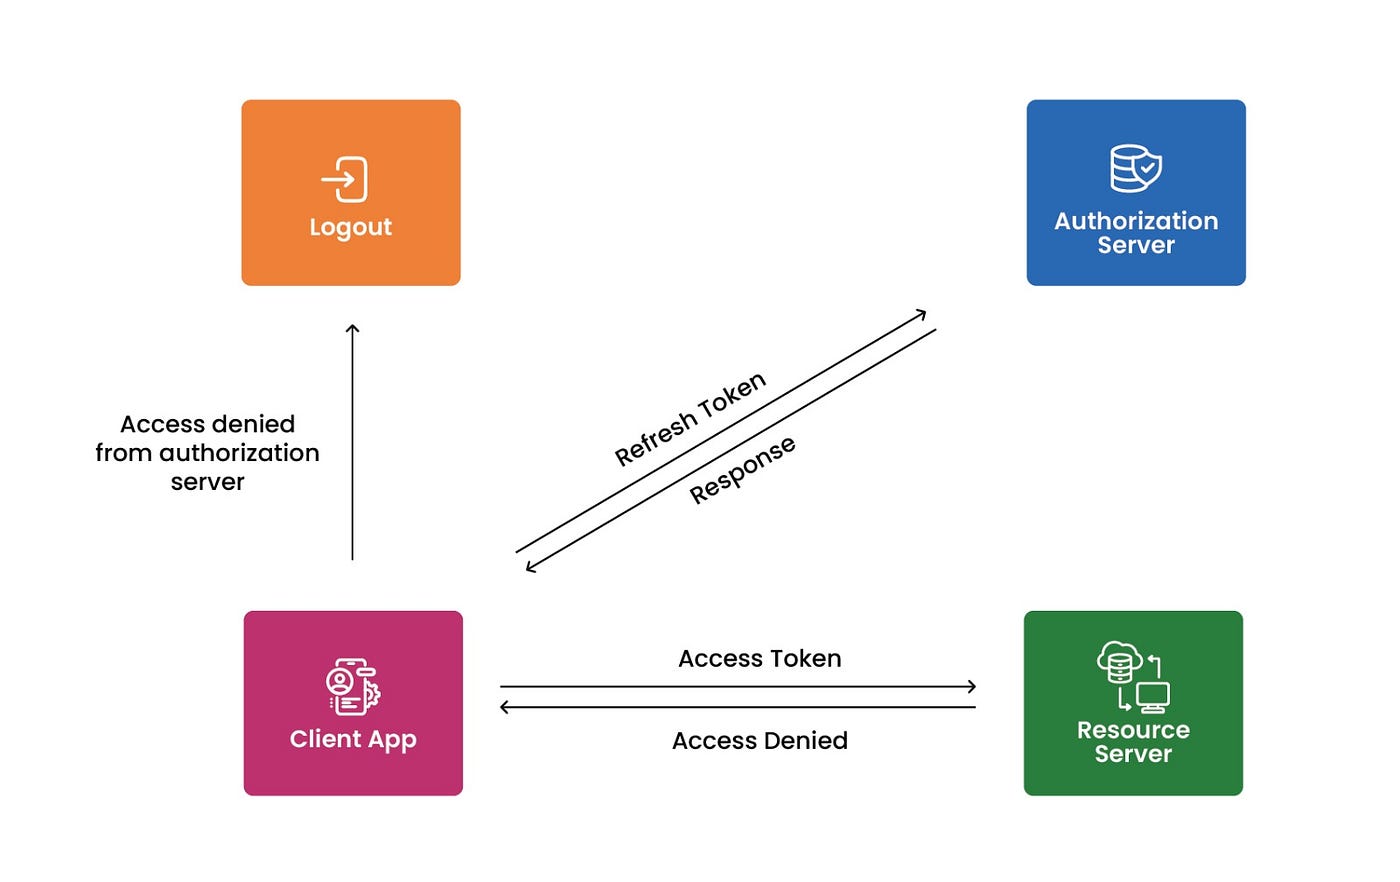
Image source: https://medium.com/@bakhtmunir/refresh-token-in-angular-e212c2adaa77
Now, let's demystify the concepts of access tokens and refresh tokens in a way that's easy to grasp. Imagine a scenario where you don't want to repeatedly enter your email and password every time you access something that's yours. This is where access and refresh tokens come into play.
Access Token:
- Think of the access token as a short-lived pass, like a ticket to a concert. It grants you access to your resources, but it doesn't last forever, maybe just for a day. After that day, you'd typically need to refresh the access token by logging in again.
Refresh Token:
Now, for big organizations like Google, they've got a clever trick. They use a refresh token, which acts like a backstage pass that lasts longer (maybe 2 hours or 1 hour). This token is also stored in a database, like a secret key.
If your access token expires, and you try to access something, you'll get a message saying it's expired. Instead of bothering you to log in again, the system can quietly send a request with your refresh token to get a new access token. It's like saying, "Hey, my backstage pass is still valid, can I get a new ticket?"
In the backend, it checks if the refresh token you sent matches the one it has. If they match, it's like reopening your session. It's a bit like logging in again, but behind the scenes. The system then sends you a new access token, like a refreshed ticket.
Why Refresh Tokens Matter:
This dance of tokens is handy because, on the frontend, if there's a 401 error (meaning your access is expired), instead of asking you to log in again, a bit of code can quietly request a refresh using the refresh token.
You don't need to keep entering your credentials. The refresh token does the job behind the scenes, ensuring a smooth and uninterrupted user experience.
So, in a nutshell, access tokens and refresh tokens work together to keep your digital experience seamless, avoiding the hassle of constant logins. Now, armed with this understanding, you're well-prepared for discussions, even in interviews. Access token, refresh token, it's all about making your online interactions smoother.
Exact Definitions:
Access Token: Access tokens are used to authenticate API requests to access protected resources. They are small pieces of code that contain a large amount of data, such as information about the user, permissions, groups, and timeframes. Access tokens are usually short-lived tokens that expire after a short period of time.
Refresh Token: Refresh tokens are long-lived tokens that are used to obtain new access tokens when the current ones expire. Refresh tokens allow users to get new access tokens without having to log in again.
Setting Up the Backend
Certainly! Below is a simple and concise guide for our backend setup:
1. Installing Required Packages:
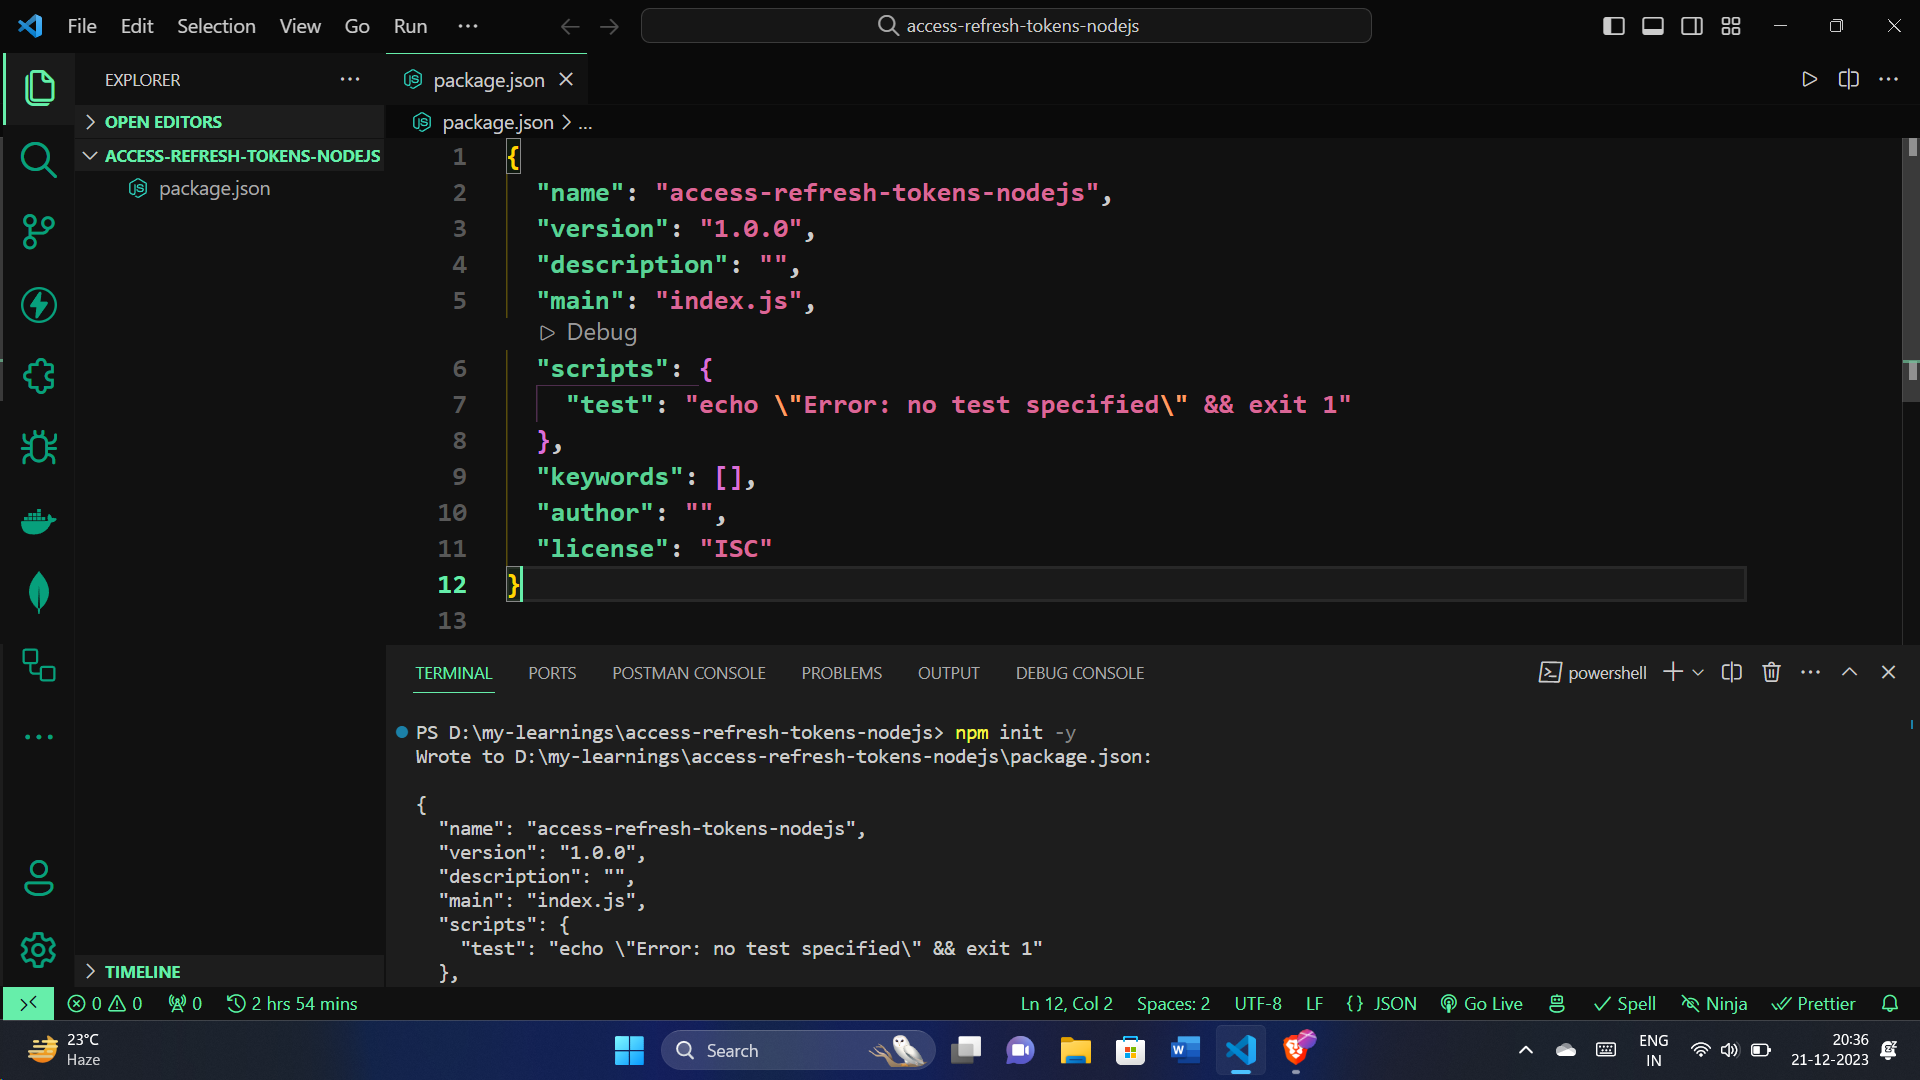
Let's set up the project by running npm init -y in the terminal. This initializes a new Node.js project.
Now, let's install the necessary libraries with the following command:
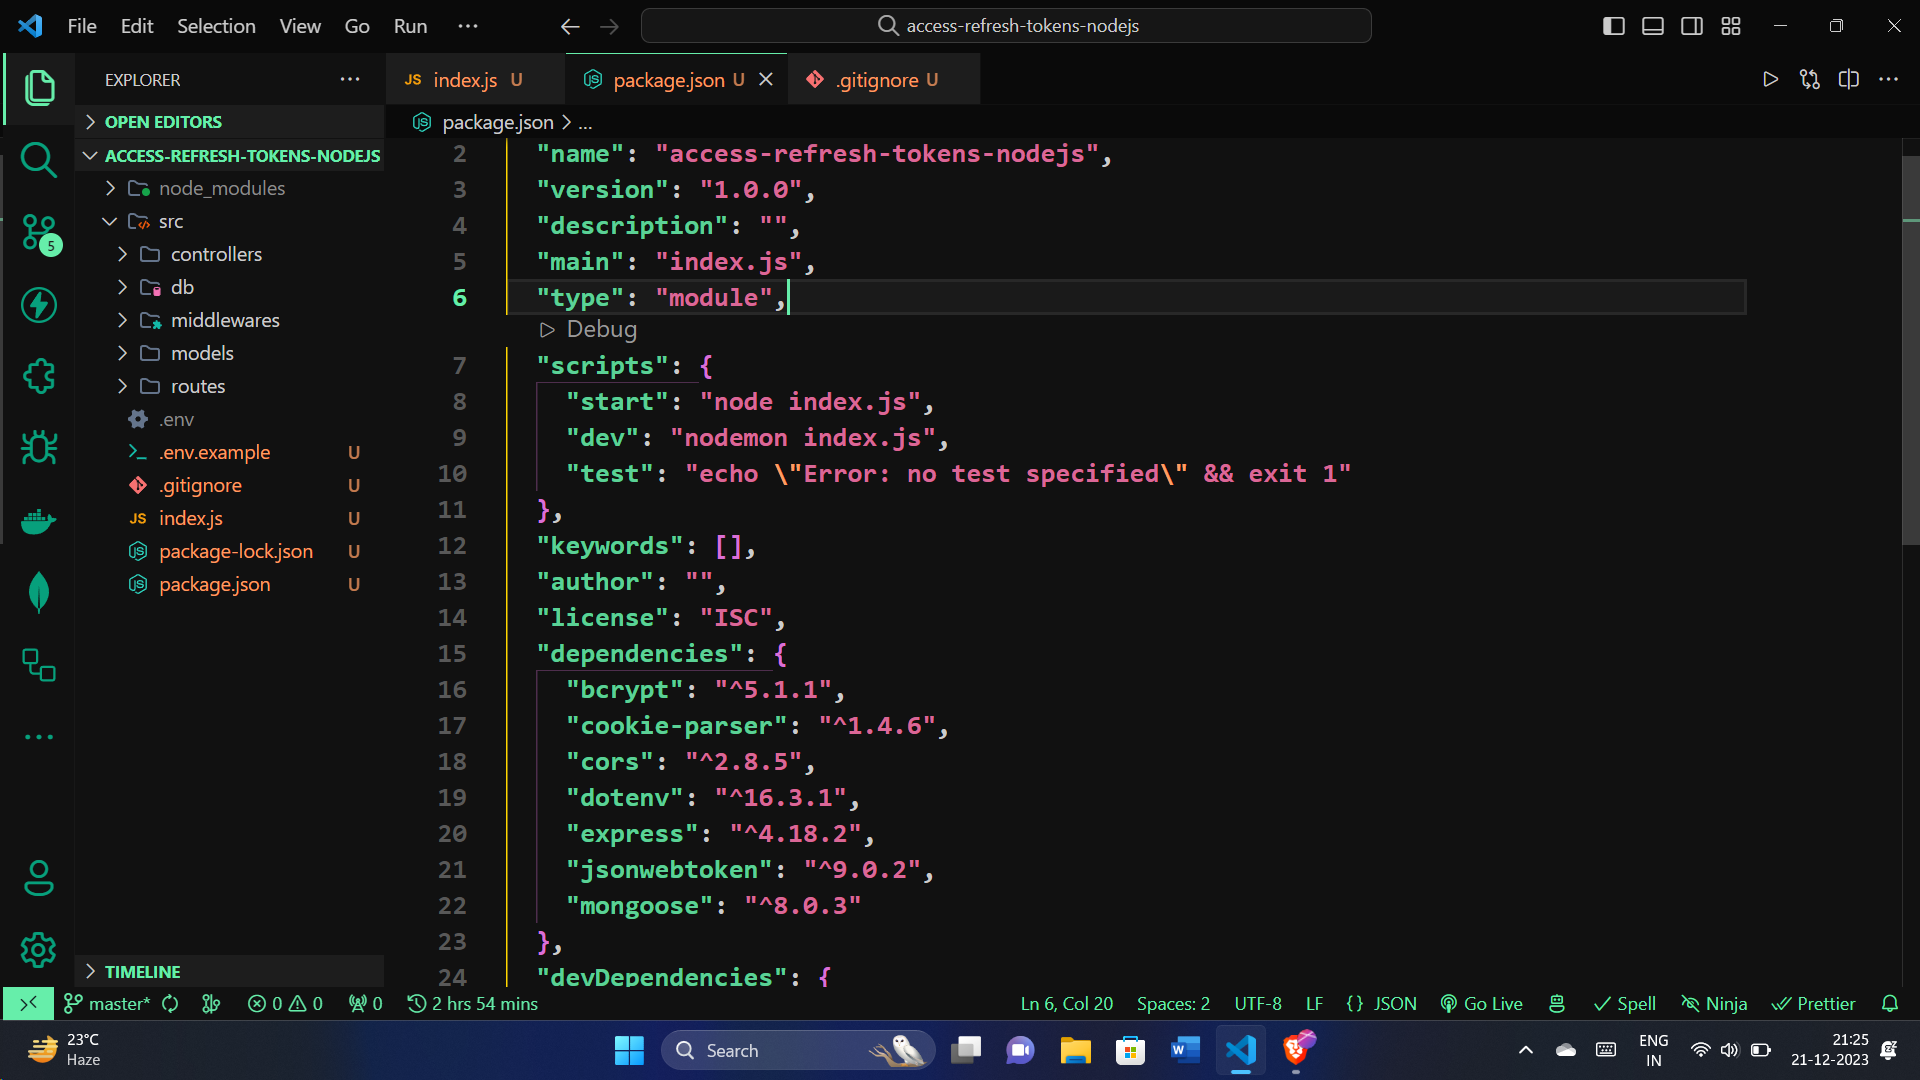
npm install express cors mongoose bcrypt jsonwebtoken dotenv cookie-parser
Here's what each library does:
express: The main framework for building the server.cors: Handles cross-origin resource sharing.mongoose: Enables connection to MongoDB.bcrypt: Provides password hashing for security.jsonwebtoken: Supports the creation and verification of JSON web tokens.dotenv: Facilitates the use of environment variables with a.envfile.cookie-parser: A tool for handling cookies.
Additionally, for a smoother development experience, install nodemon as a devDependency:
npm install nodemon --save-dev
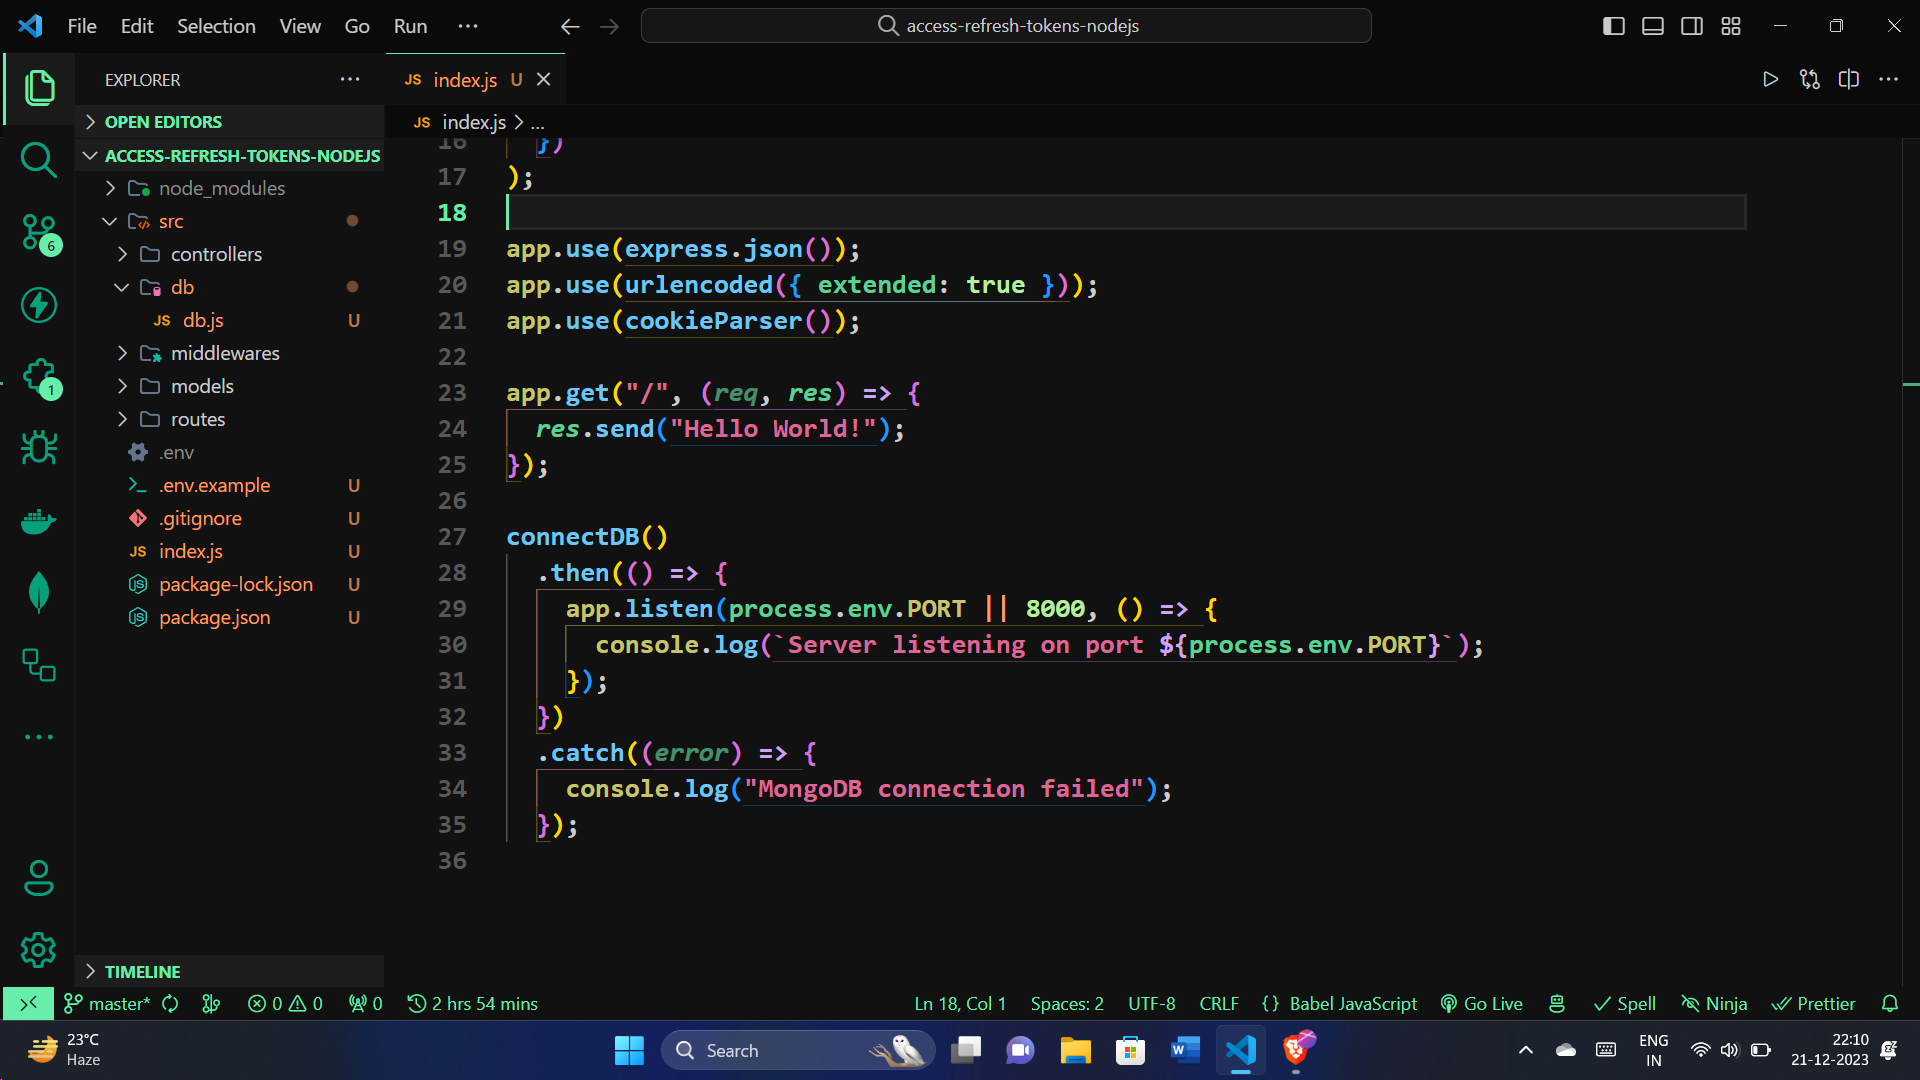
Make sure you have a folder that looks like this one:
2. Configuring Express Server:
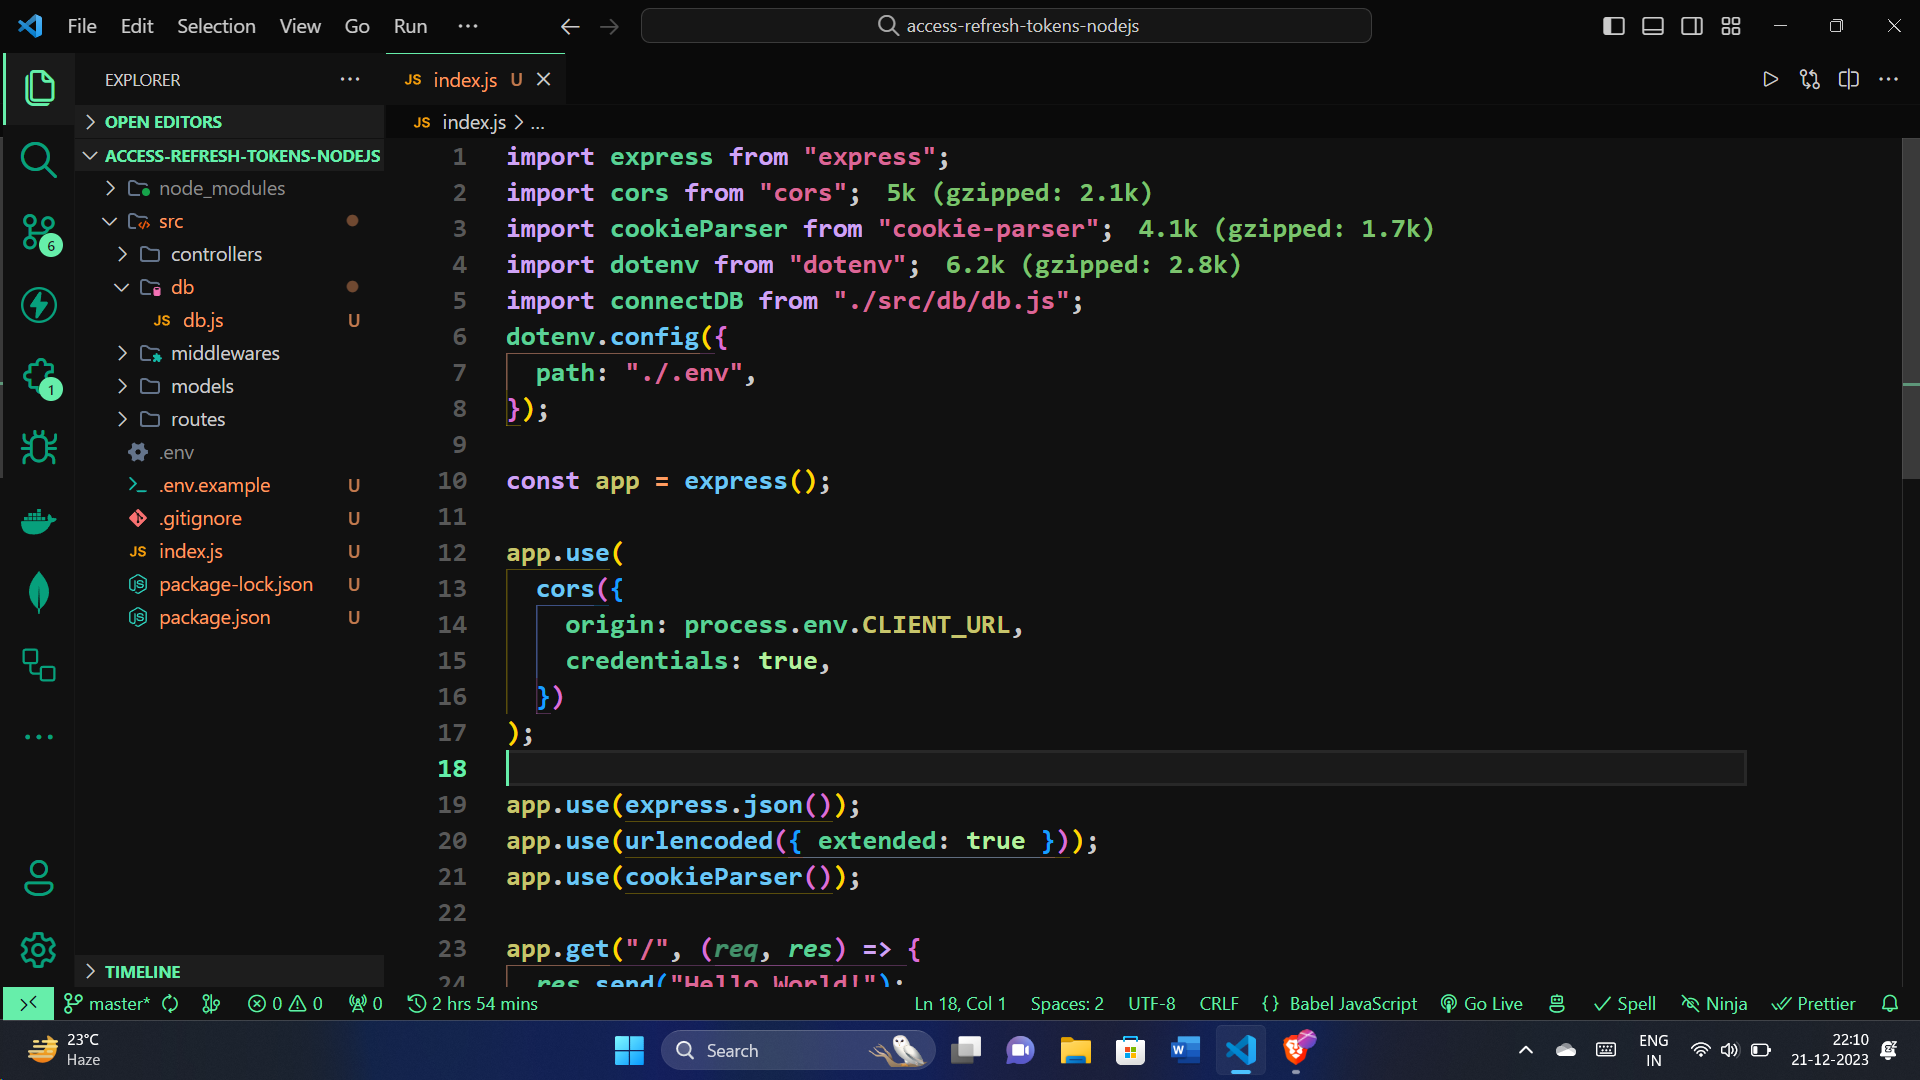
Now, let's configure our Express server in the index.js file. This file acts as the heart of our server, managing requests and connecting to MongoDB. Below is a concise breakdown:
// Importing necessary modules
import express, { urlencoded } from "express";
import cors from "cors";
import cookieParser from "cookie-parser";
import dotenv from "dotenv";
import connectDB from "./src/db/db.js";

// Configuring environment variables
dotenv.config({
  path: "./.env",
});

const app = express();

// Adding middleware for CORS, JSON parsing, and cookies
app.use(
  cors({
    origin: process.env.CLIENT_URL,
    credentials: true,
  })
);
app.use(express.json());
app.use(urlencoded({ extended: true }));
app.use(cookieParser());

// Creating a simple route
app.get("/", (req, res) => {
  res.send("Hello World!");
});

// Connecting to MongoDB and starting the server
connectDB()
  .then(() => {
    app.listen(process.env.PORT || 8000, () => {
      console.log(`Server listening on port ${process.env.PORT}`);
    });
  })
  .catch((error) => {
    console.log("MongoDB connection failed");
  });
Connecting to MongoDB:
Now, let's establish the connection to MongoDB using the connectDB module. This module is responsible for connecting our server to the MongoDB database. Here's the module defined in a concise manner:
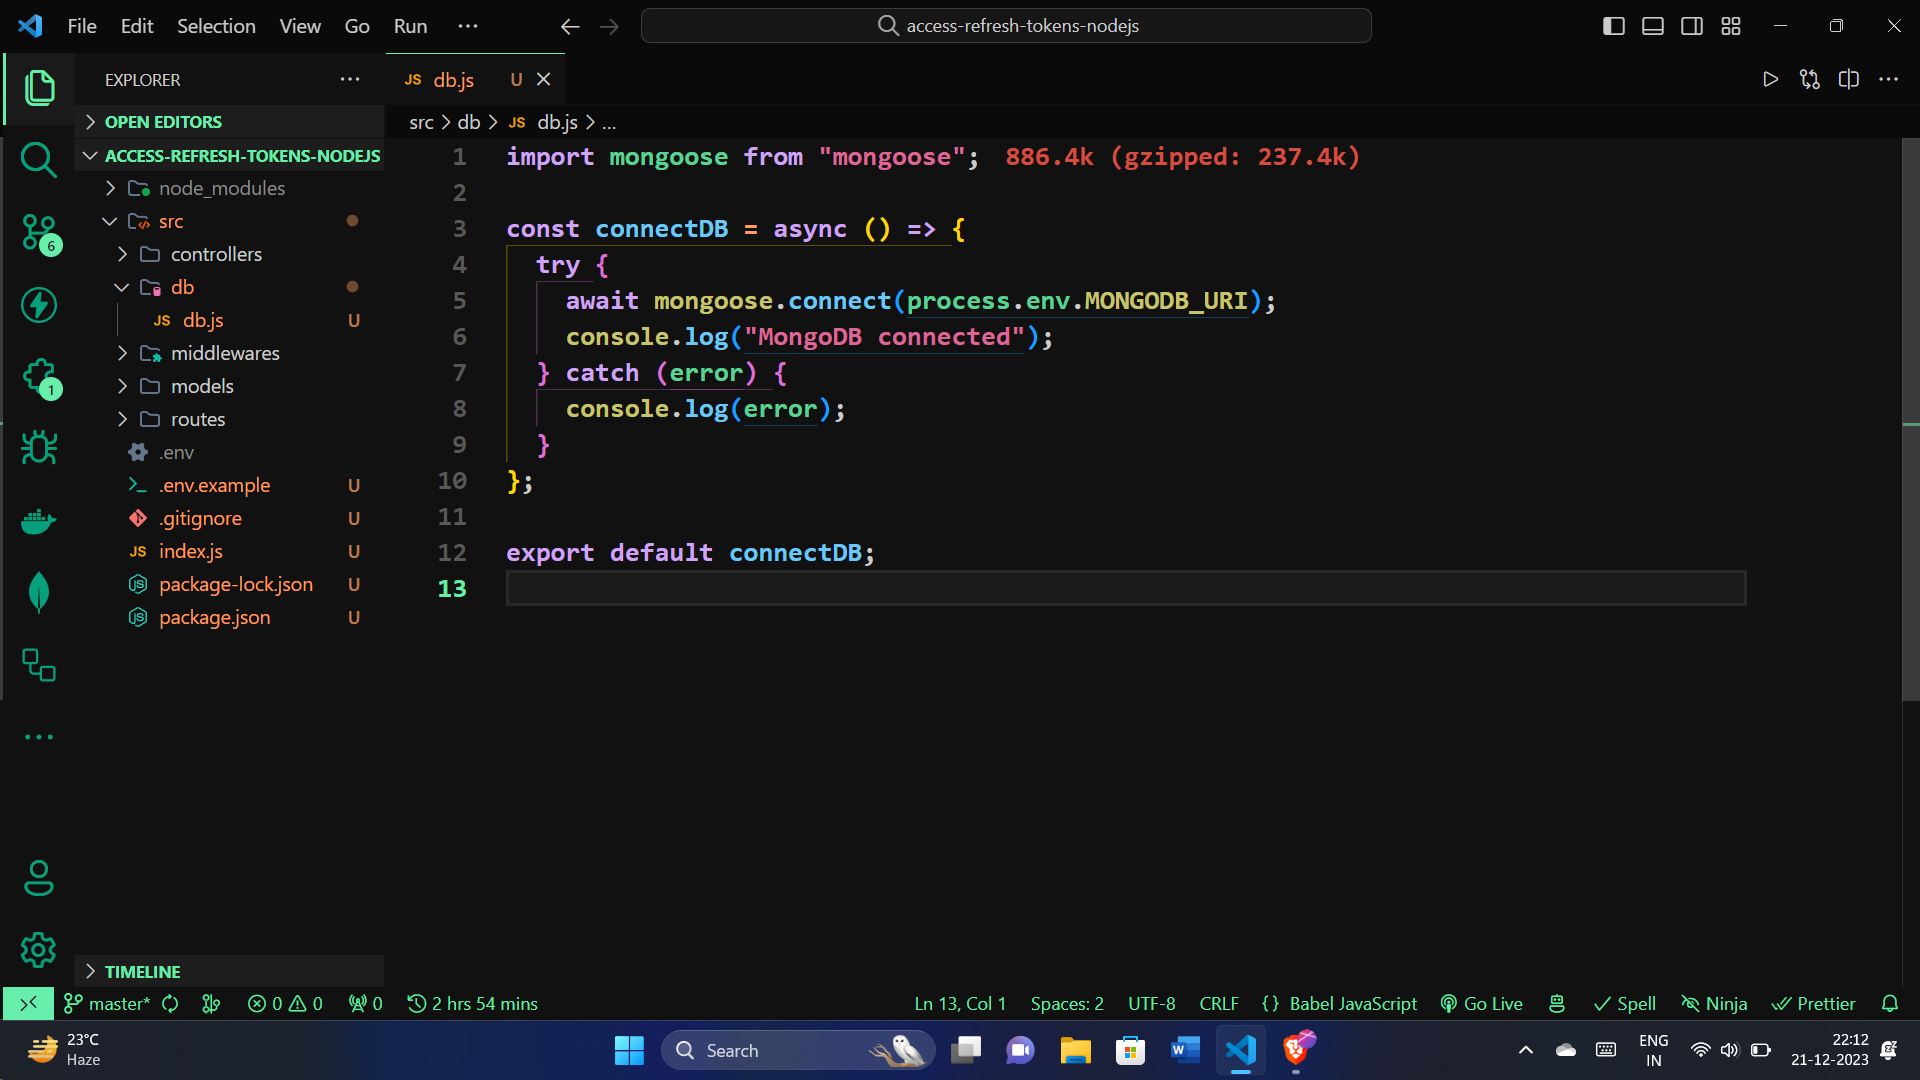
import mongoose from "mongoose";

const connectDB = async () => {
  try {
    await mongoose.connect(process.env.MONGODB_URI);
    console.log("MongoDB connected");
  } catch (error) {
    console.log(error);
  }
};

export default connectDB;
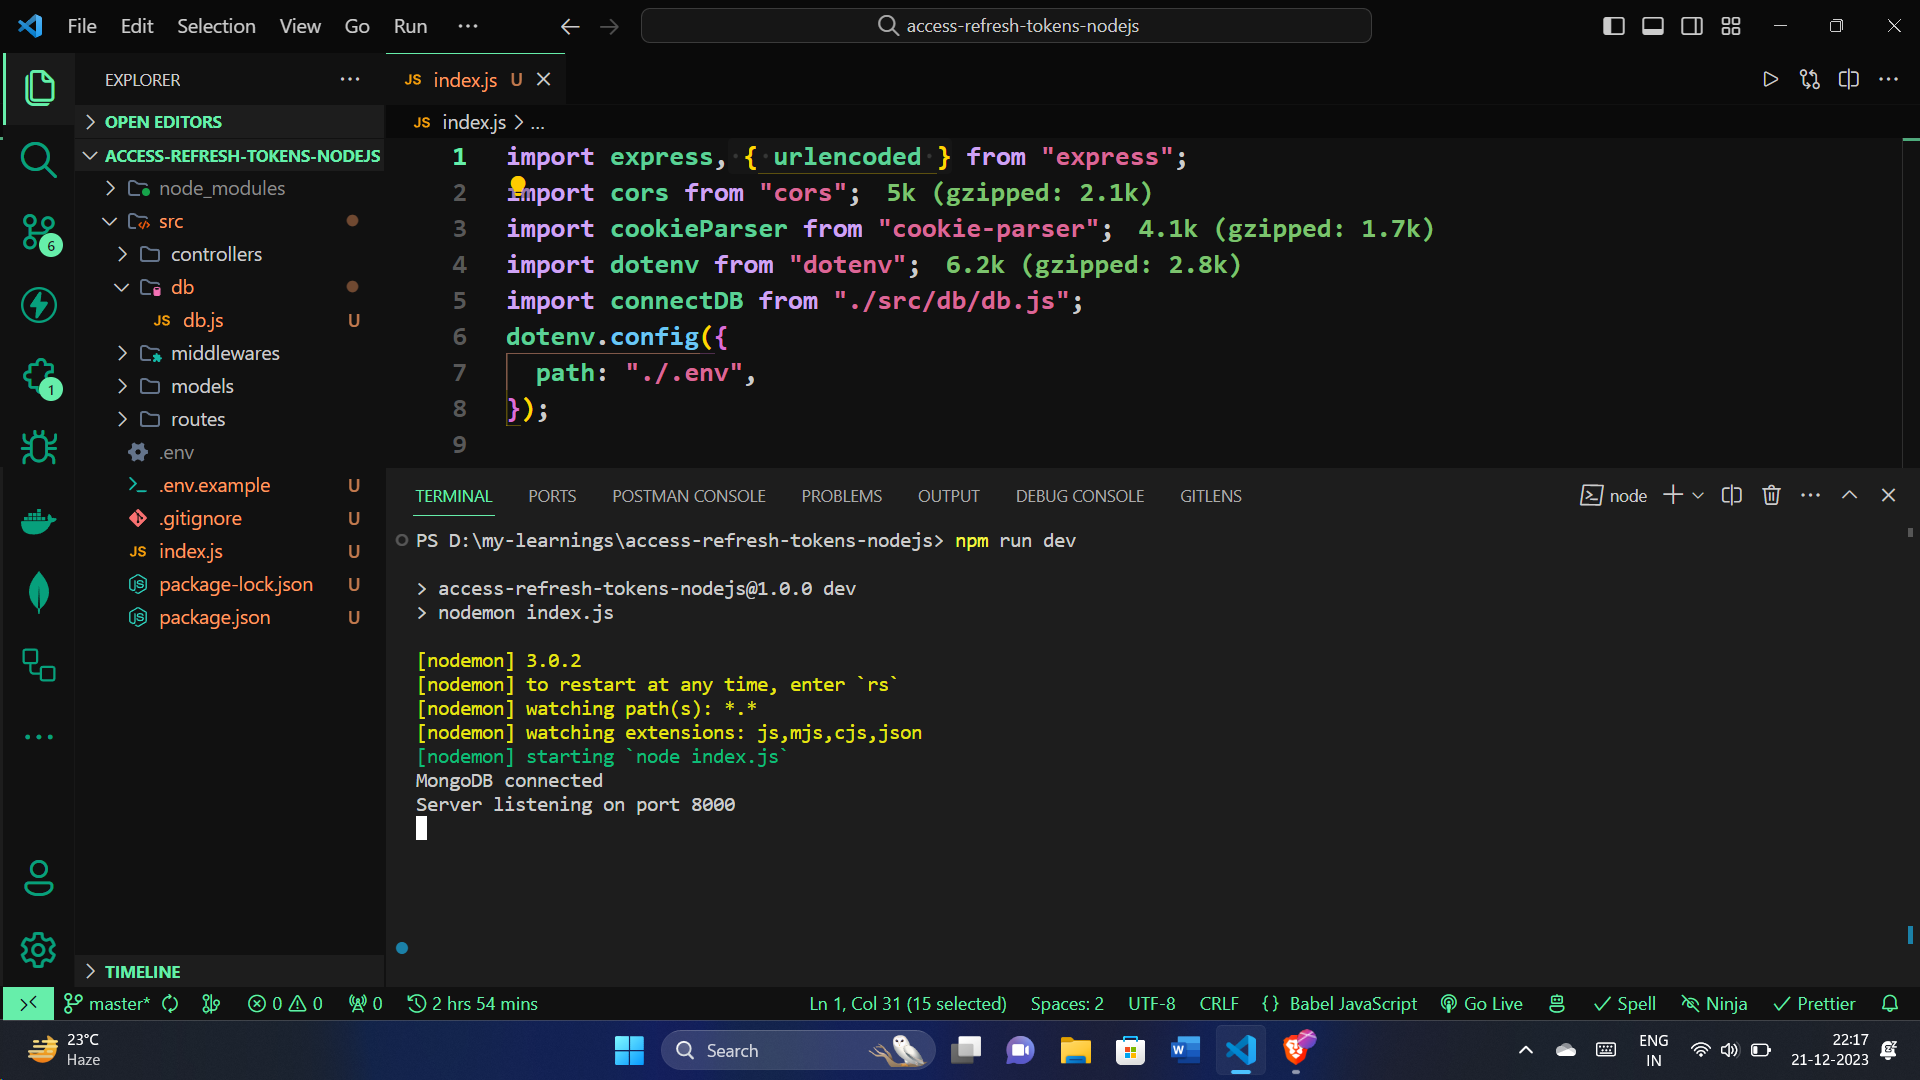
Checking Server Functionality:
To ensure our server is up and running, let's execute the following command:
npm run dev
This command, typically set up in our package.json file uses nodemon to run the server in development mode. It automatically restarts the server when changes are made, making the development process smoother.
If all is well, you should see a message in your console indicating that the server is listening on a specific port, for example:
Now, open your web browser and go to http://localhost:8000/. If everything is set up correctly, you should see "Hello World!" displayed in your browser.
This quick check ensures that your server is indeed working as expected. If you encounter any issues or if the server doesn't start, review your code and configurations.
Defining and Implementing User Schema
Now, let's define and implement the userSchema module. This schema represents the structure of our user data in MongoDB. Here's a concise breakdown:

import mongoose, { Schema } from "mongoose";
import jwt from "jsonwebtoken";
import bcrypt from "bcrypt";
const userSchema = new Schema(
{
email: {
type: String,
required: true,
unique: true,
},
password: {
type: String,
required: true,
},
refreshToken: {
type: String,
},
},
{ timestamps: true }
);
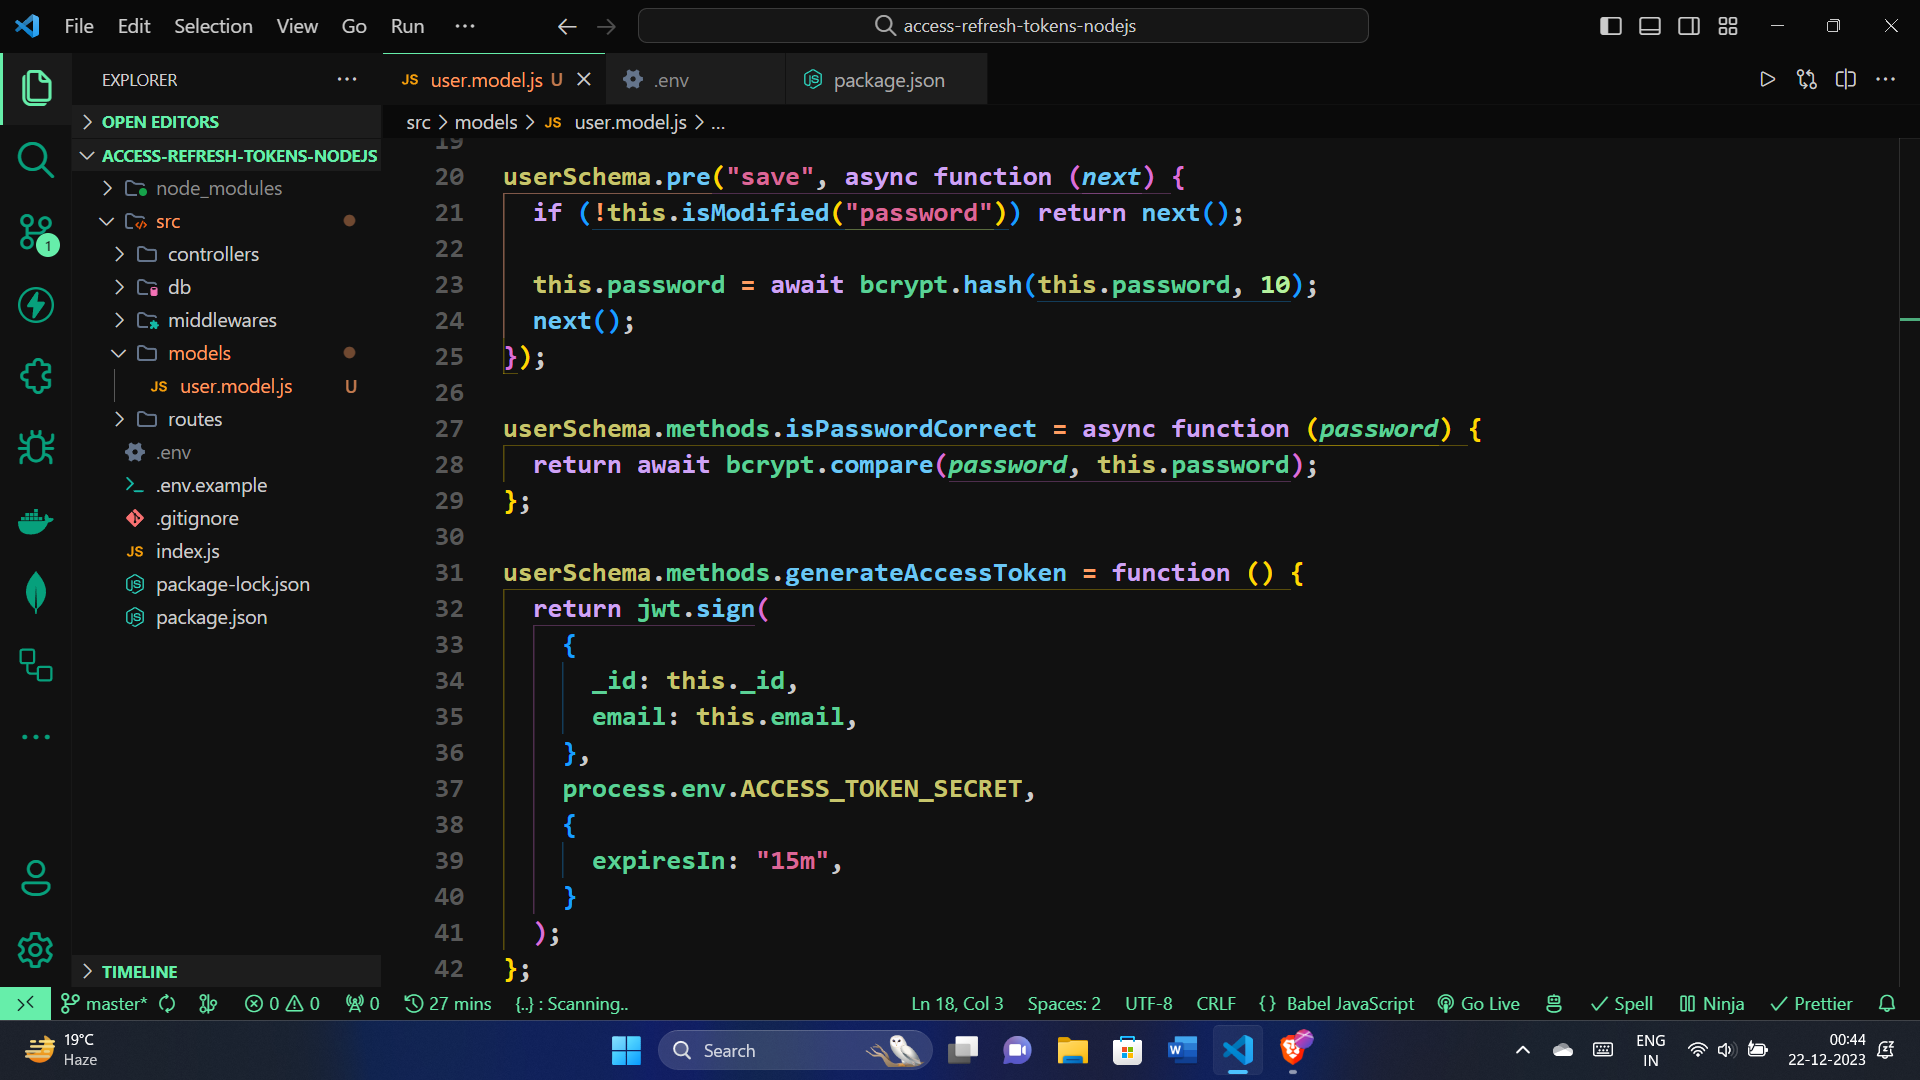
// Middleware to hash the password before saving
userSchema.pre("save", async function (next) {
if (!this.isModified("password")) return next();
this.password = await bcrypt.hash(this.password, 10);
next();
});
// Method to check if the entered password is correct
userSchema.methods.isPasswordCorrect = async function (password) {
return await bcrypt.compare(password, this.password);
};
// Method to generate an access token
userSchema.methods.generateAccessToken = function () {
return jwt.sign(
{
_id: this._id,
email: this.email,
},
process.env.ACCESS_TOKEN_SECRET,
{
expiresIn: "15m",
}
);
};
// Method to generate a refresh token
userSchema.methods.generateRefreshToken = function () {
return jwt.sign(
{
_id: this._id,
},
process.env.REFRESH_TOKEN_SECRET,
{
expiresIn: "15d",
}
);
};
// Creating the User model using the schema
export const User = mongoose.model("User", userSchema);
Breaking it down:
Note: Here we store refreshToken in the database.
We import
mongoosefor schema creation,jwtfor JSON web token operations, andbcryptfor password hashing.The
userSchemadefines the structure of our user data, including email, password and refreshToken, with timestamps for tracking creation and update times.A middleware (
prehook) is added to hash the password before saving it to the database.Methods are defined to check if the entered password is correct and to generate access and refresh tokens.
The
Usermodel is created using themongoose.modelfunction.
Generating Token Secrets:
To enhance security, we can generate token secrets using the following OpenSSL command:
openssl rand -hex 32
Running this command in our terminal generates a random 32-character hexadecimal string, which can be used as a strong secret for token generation.
Creating the user controller for Register and Login
Implementing the User Registration Function:
In your user controller, we will create the registerUser function. This function takes care of registering new users by validating the provided email and password, checking for existing users, and creating a new user in the database.
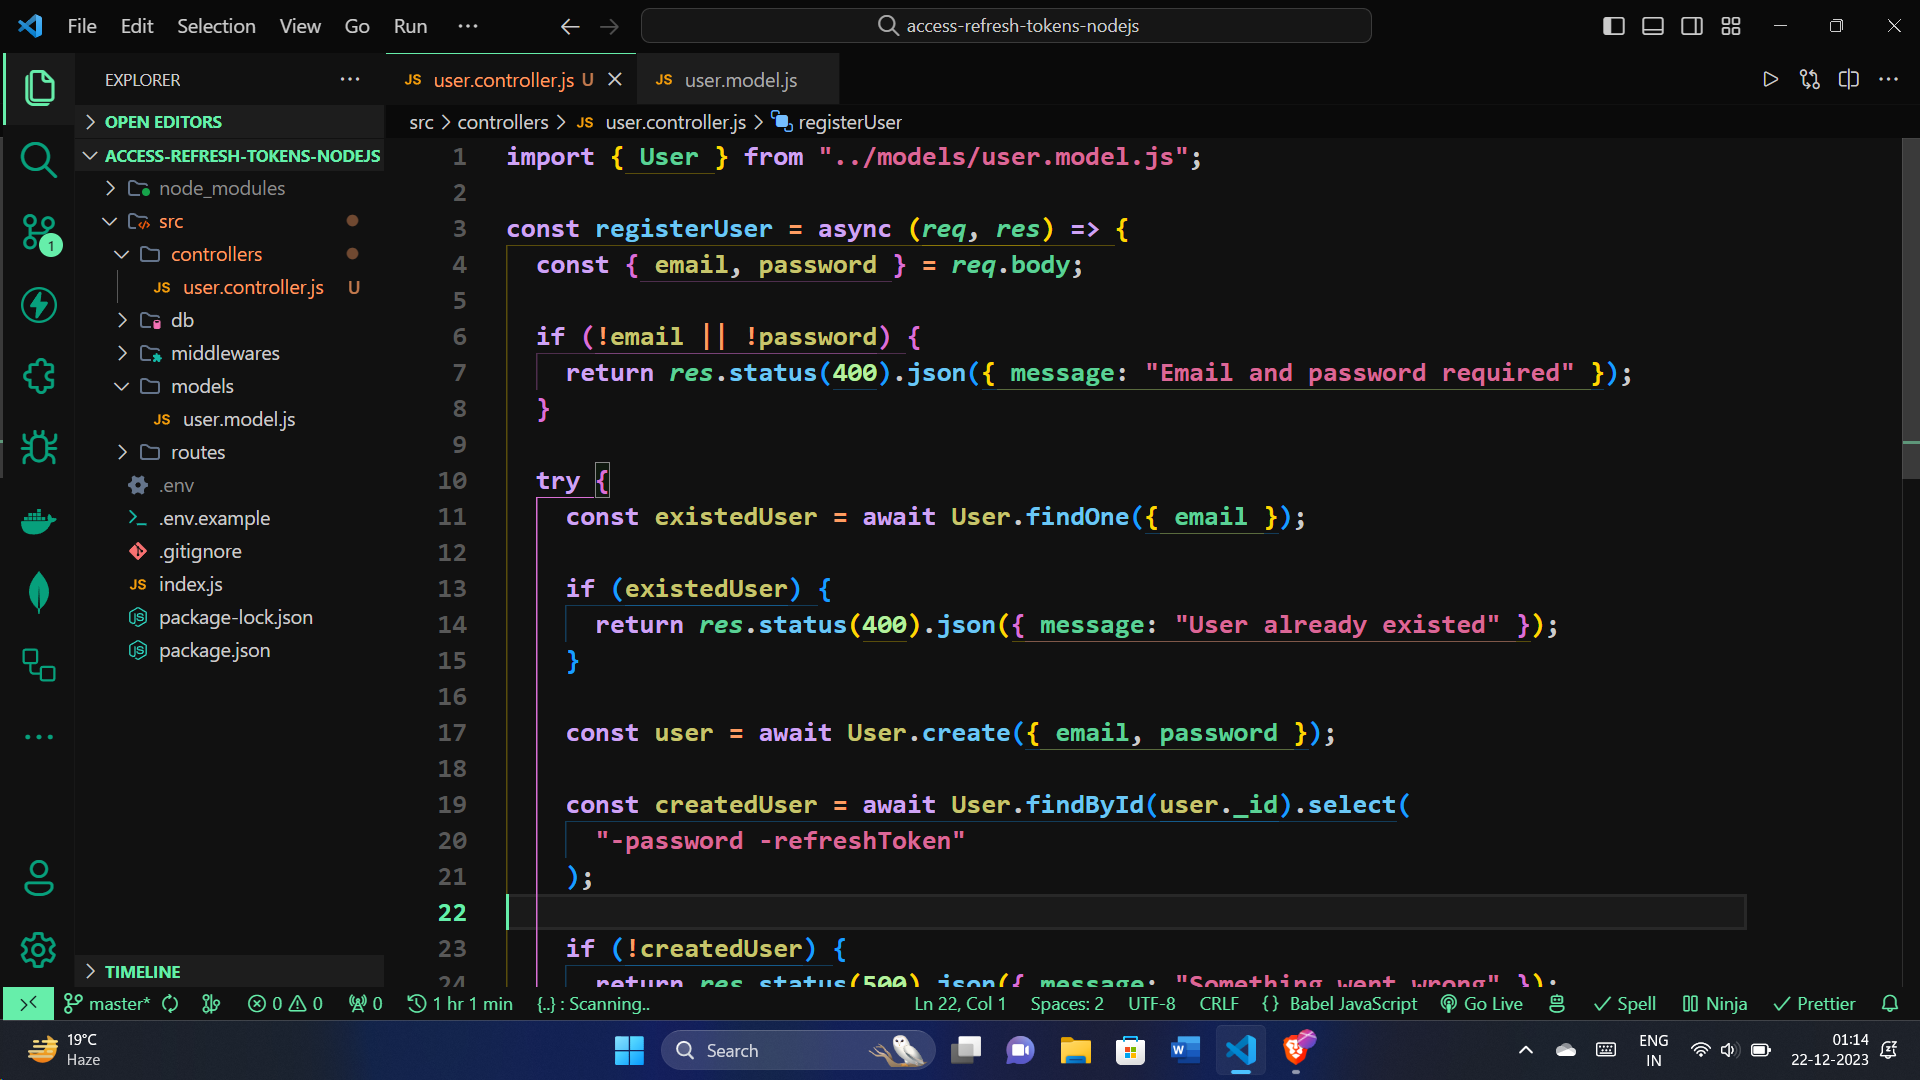
import { User } from "../models/user.model.js";
const registerUser = async (req, res) => {
const { email, password } = req.body;
// Check if email and password are provided
if (!email || !password) {
return res.status(400).json({ message: "Email and password required" });
}
try {
// Check if the user already exists
const existedUser = await User.findOne({ email });
if (existedUser) {
return res.status(400).json({ message: "User already exists" });
}
// Create a new user in the database
const user = await User.create({ email, password });
// Retrieve the created user excluding sensitive information
const createdUser = await User.findById(user._id).select(
"-password -refreshToken"
);
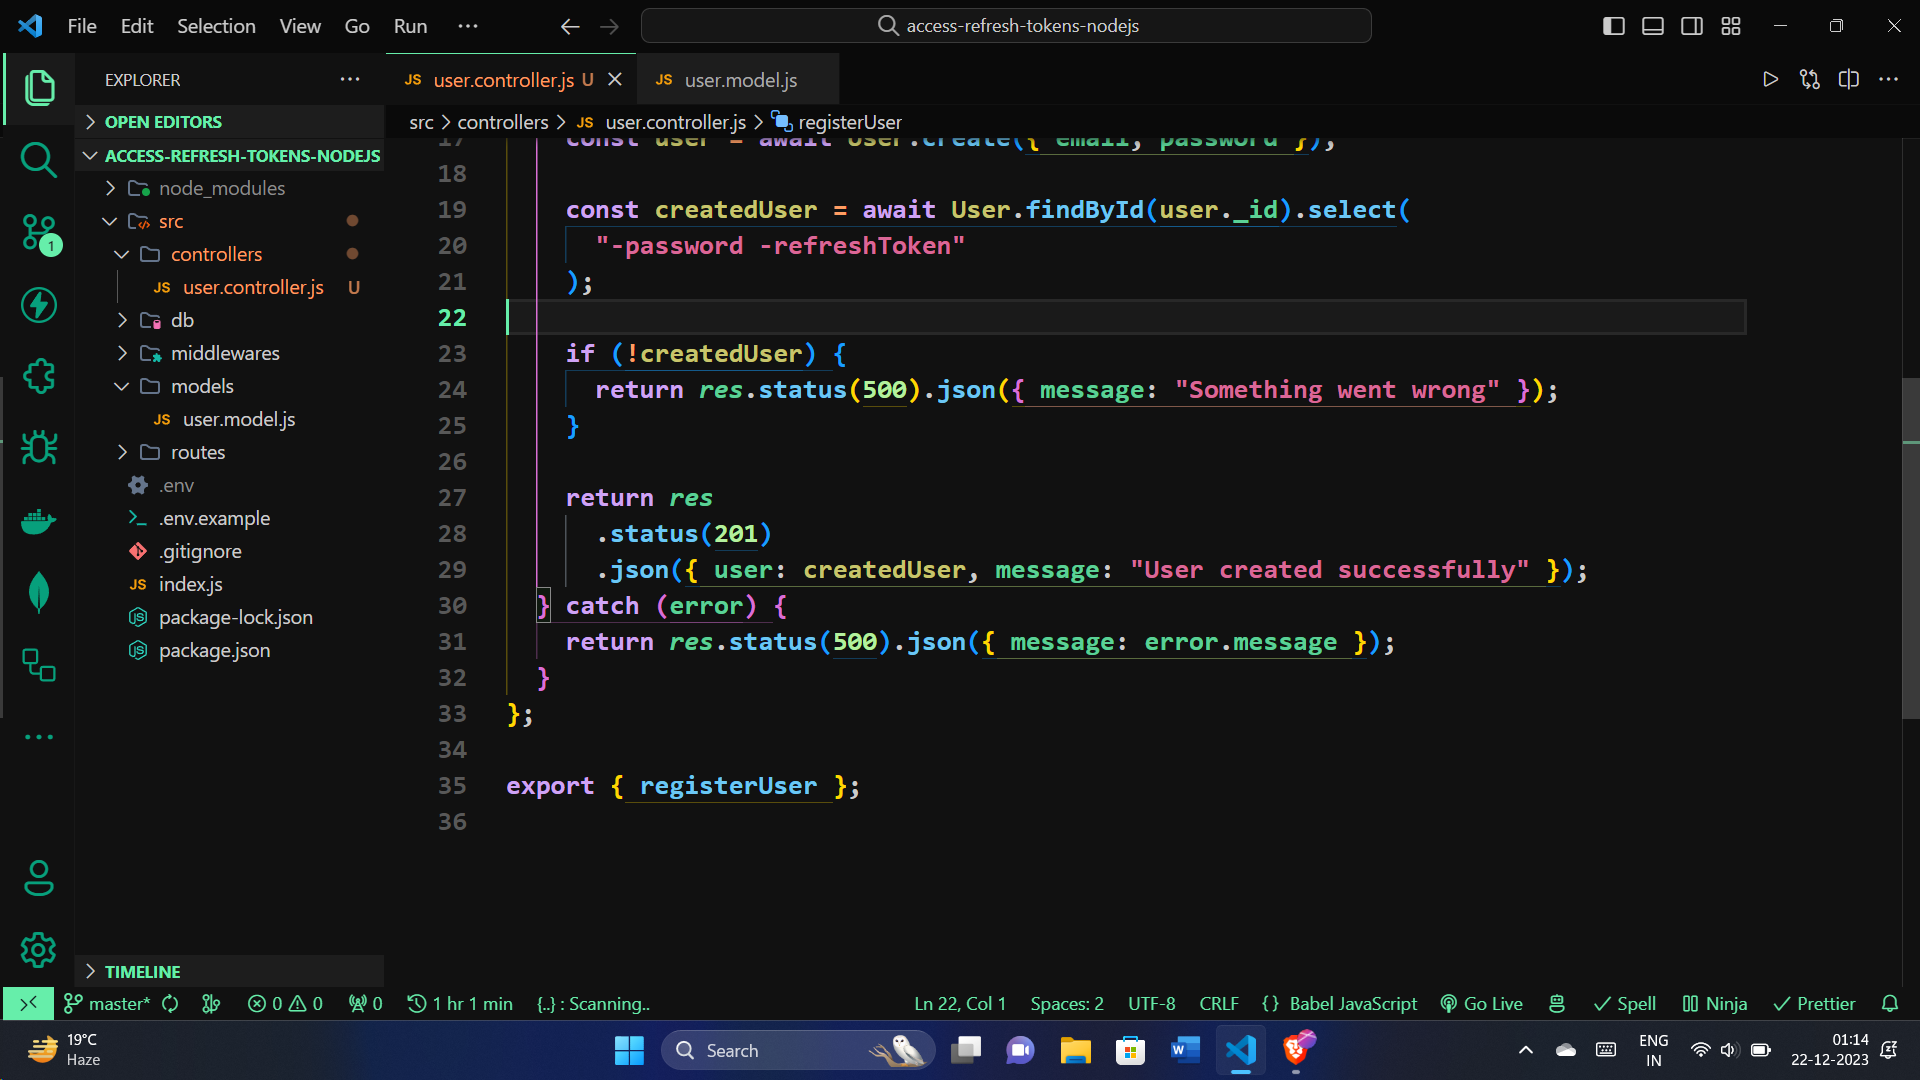
// Check if user creation was successful
if (!createdUser) {
return res.status(500).json({ message: "Something went wrong" });
}
// Send a success response with the created user details
return res
.status(201)
.json({ user: createdUser, message: "User created successfully" });
} catch (error) {
// Handle any errors that occur during the process
return res.status(500).json({ message: error.message });
}
};
export { registerUser };
Creating the User Registration Route:
Now, let's define a route for the registerUser function. In your user.routes.js:
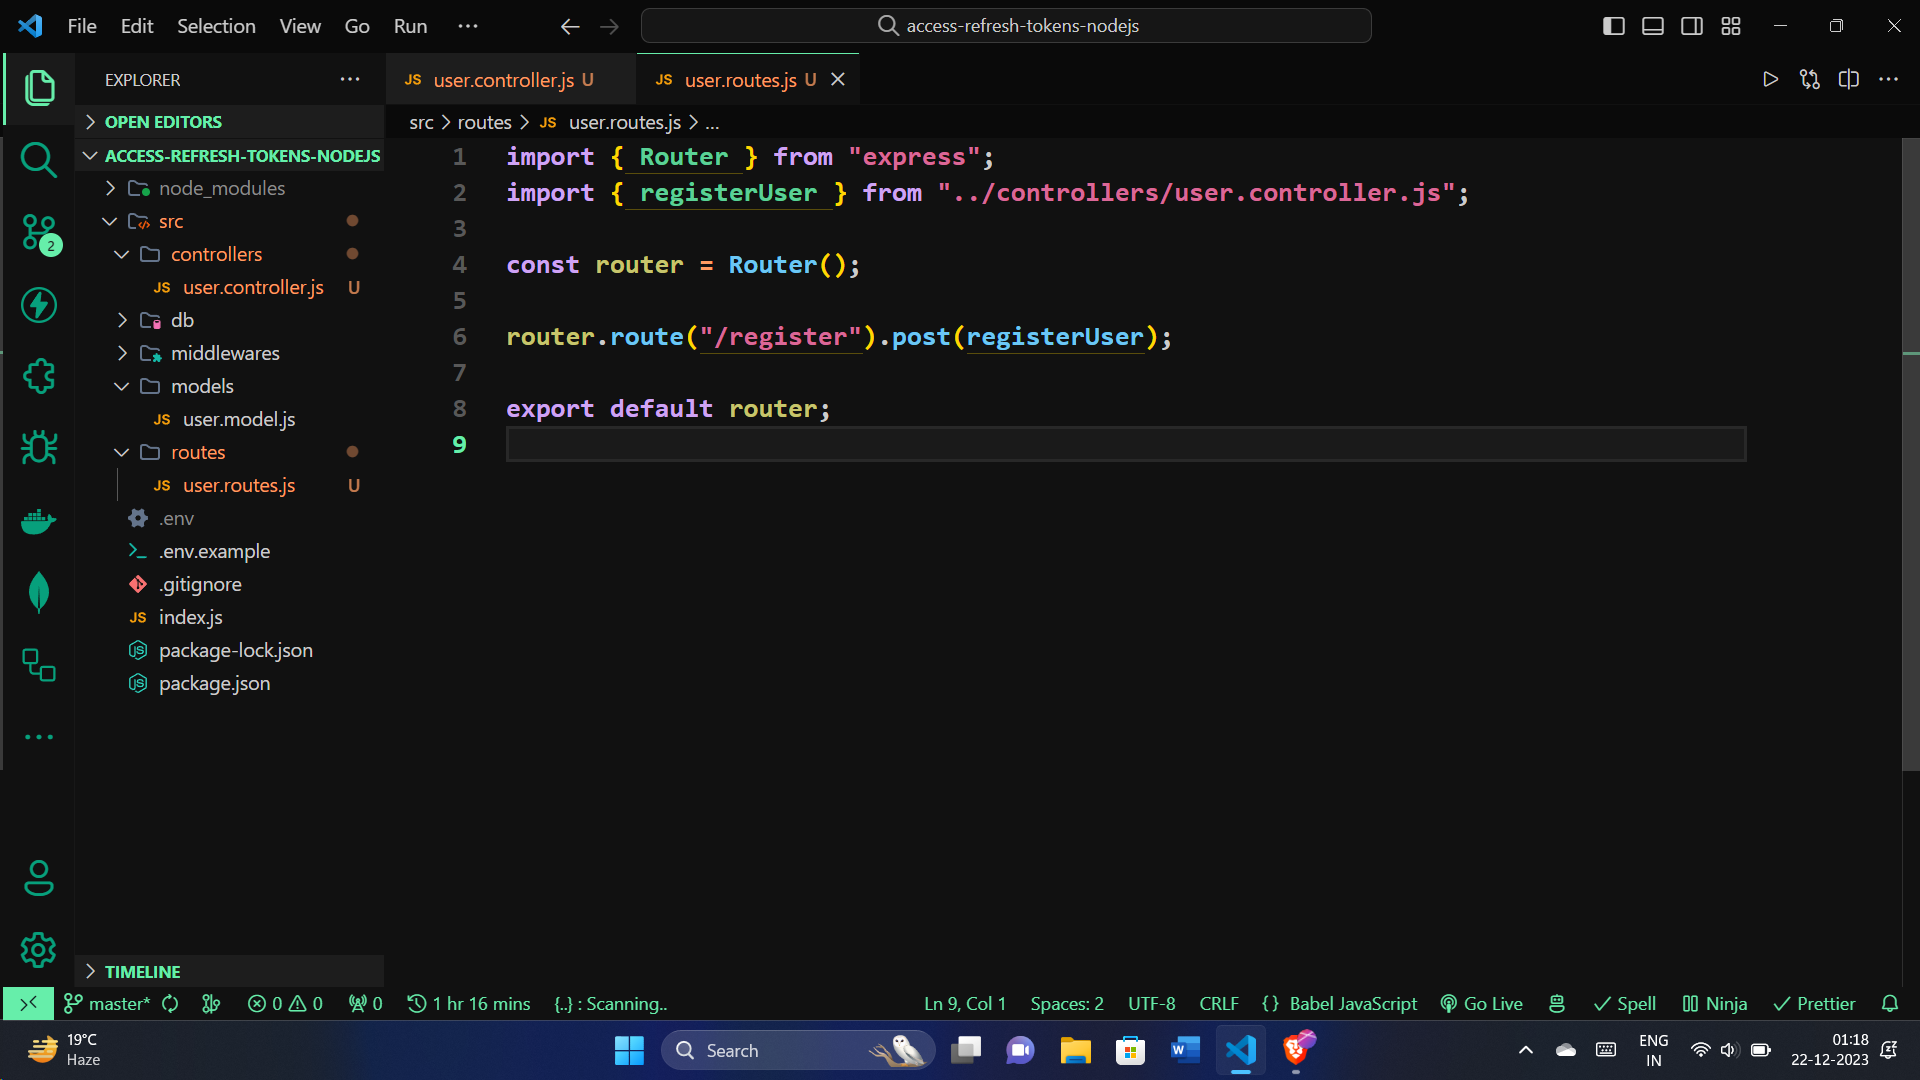
import { Router } from "express";
import { registerUser } from "../controllers/user.controller.js";

const router = Router();

router.route("/register").post(registerUser);

export default router;
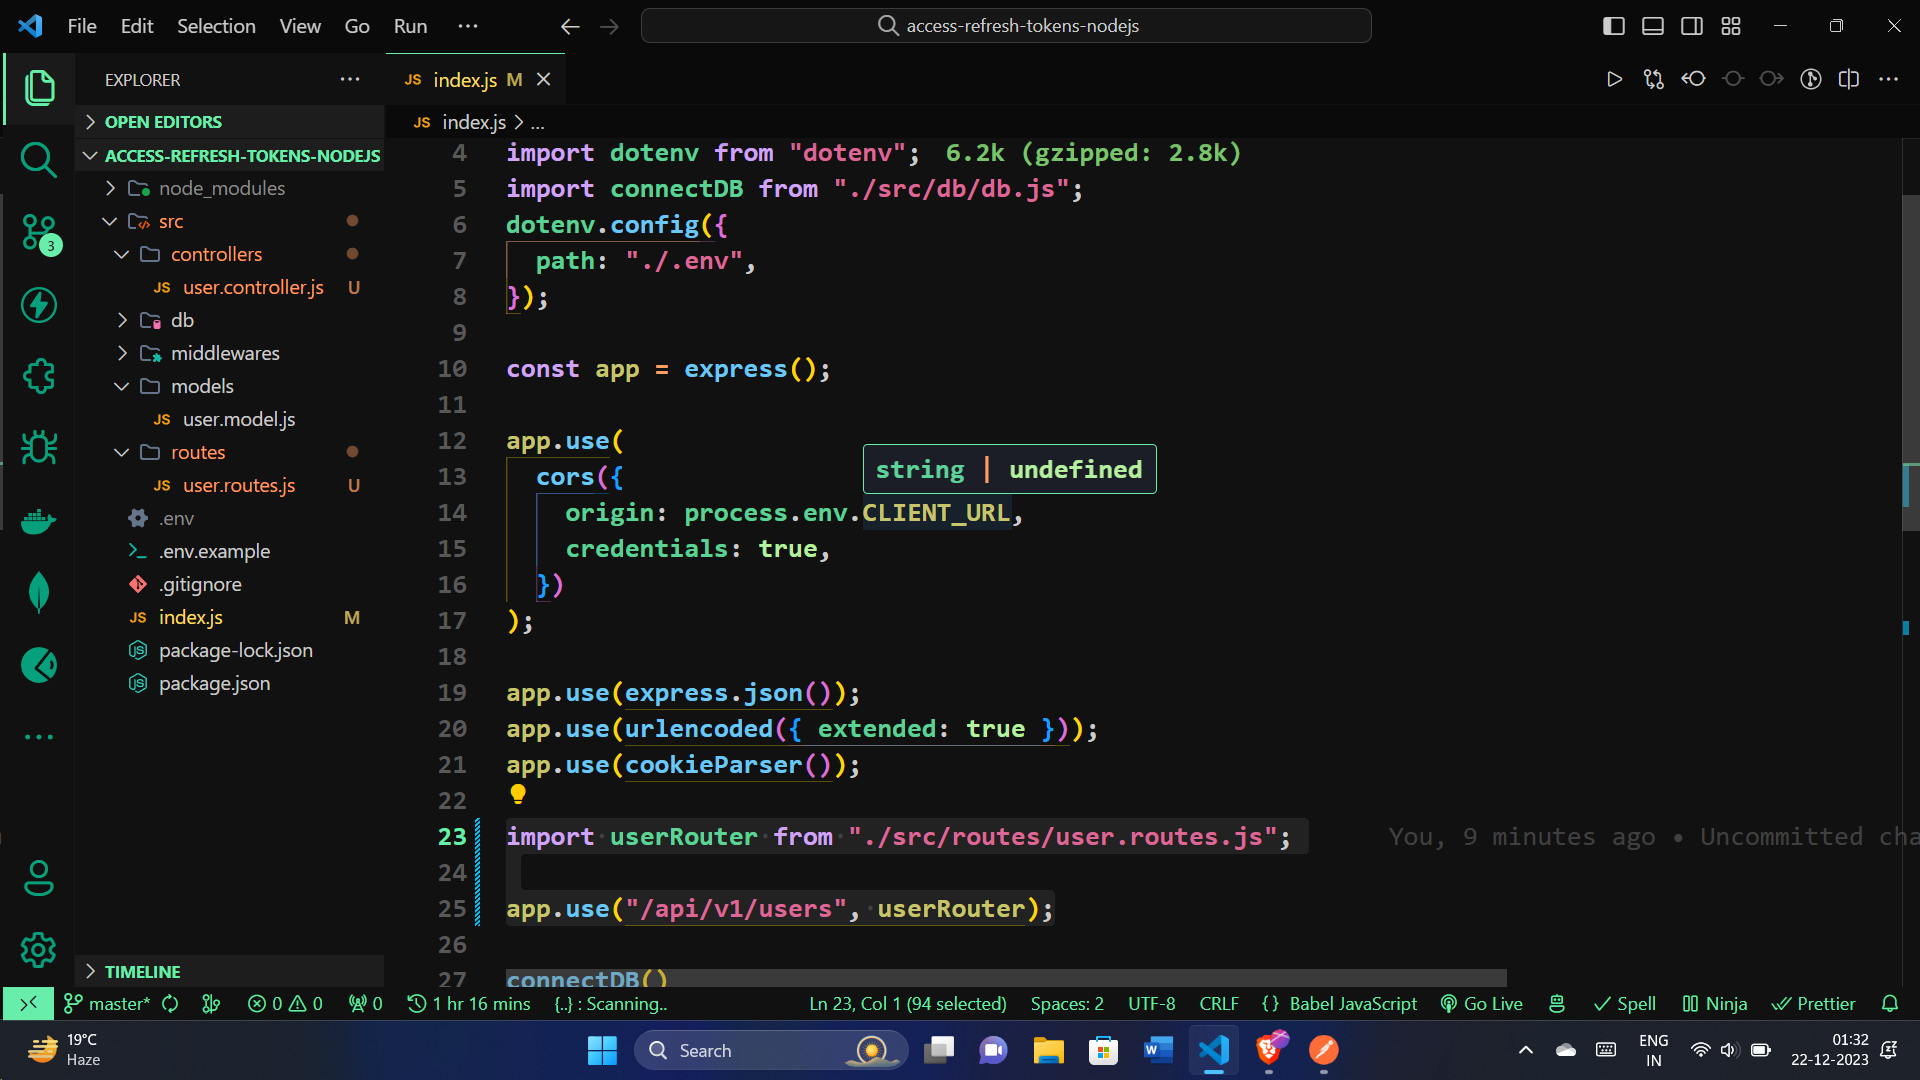
Import that the user routes in index.js:
import userRouter from "./src/routes/user.routes.js";

app.use("/api/v1/users", userRouter);
Testing with Postman:
Open Postman and create a new request.
Set the request type to
POST.Enter the URL for our register route (http://localhost:8000/api/v1/register).
Go to the "Body" tab, select
raw, and enter a JSON object with an email and password for testing:{ "email": "nawaz@gmail.com", "password": "12345" }Click "Send."
Check the response in the Postman console. You should receive a status code of
201and a JSON response indicating the user was created successfully.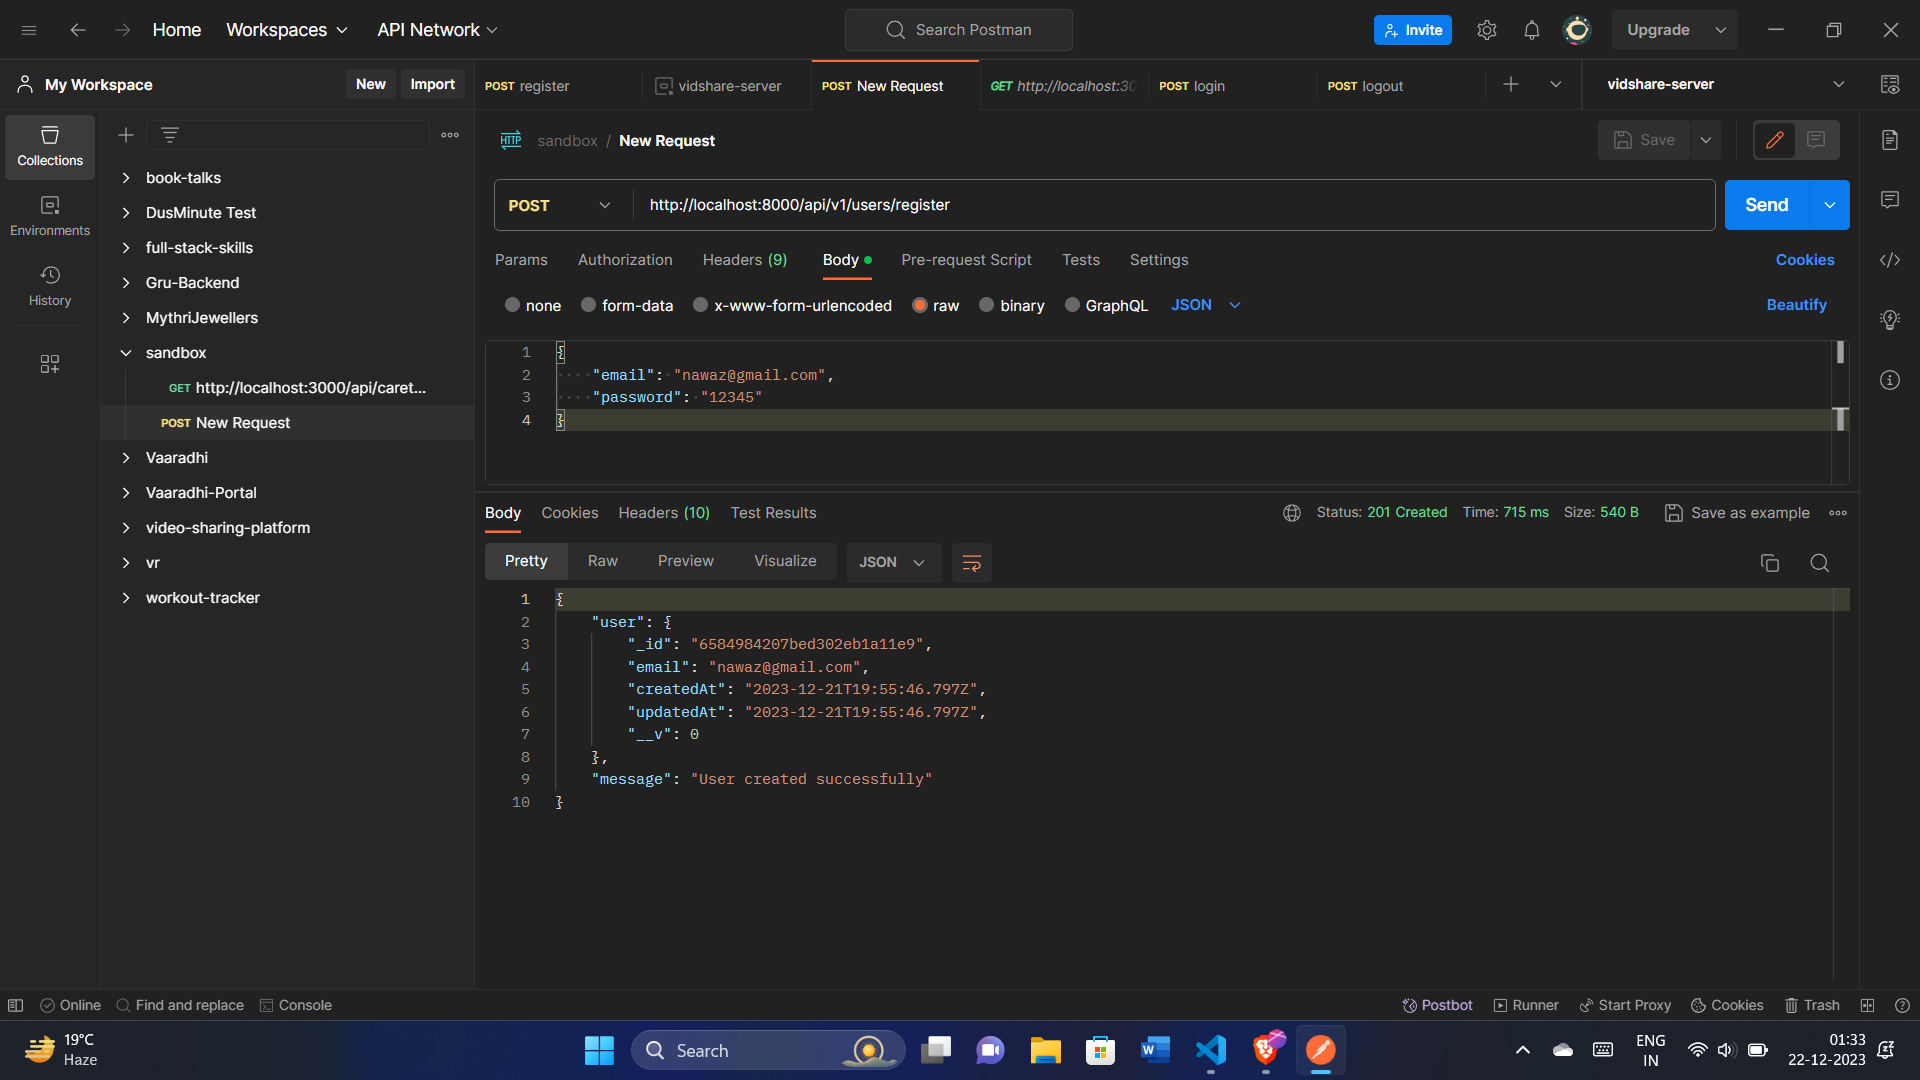
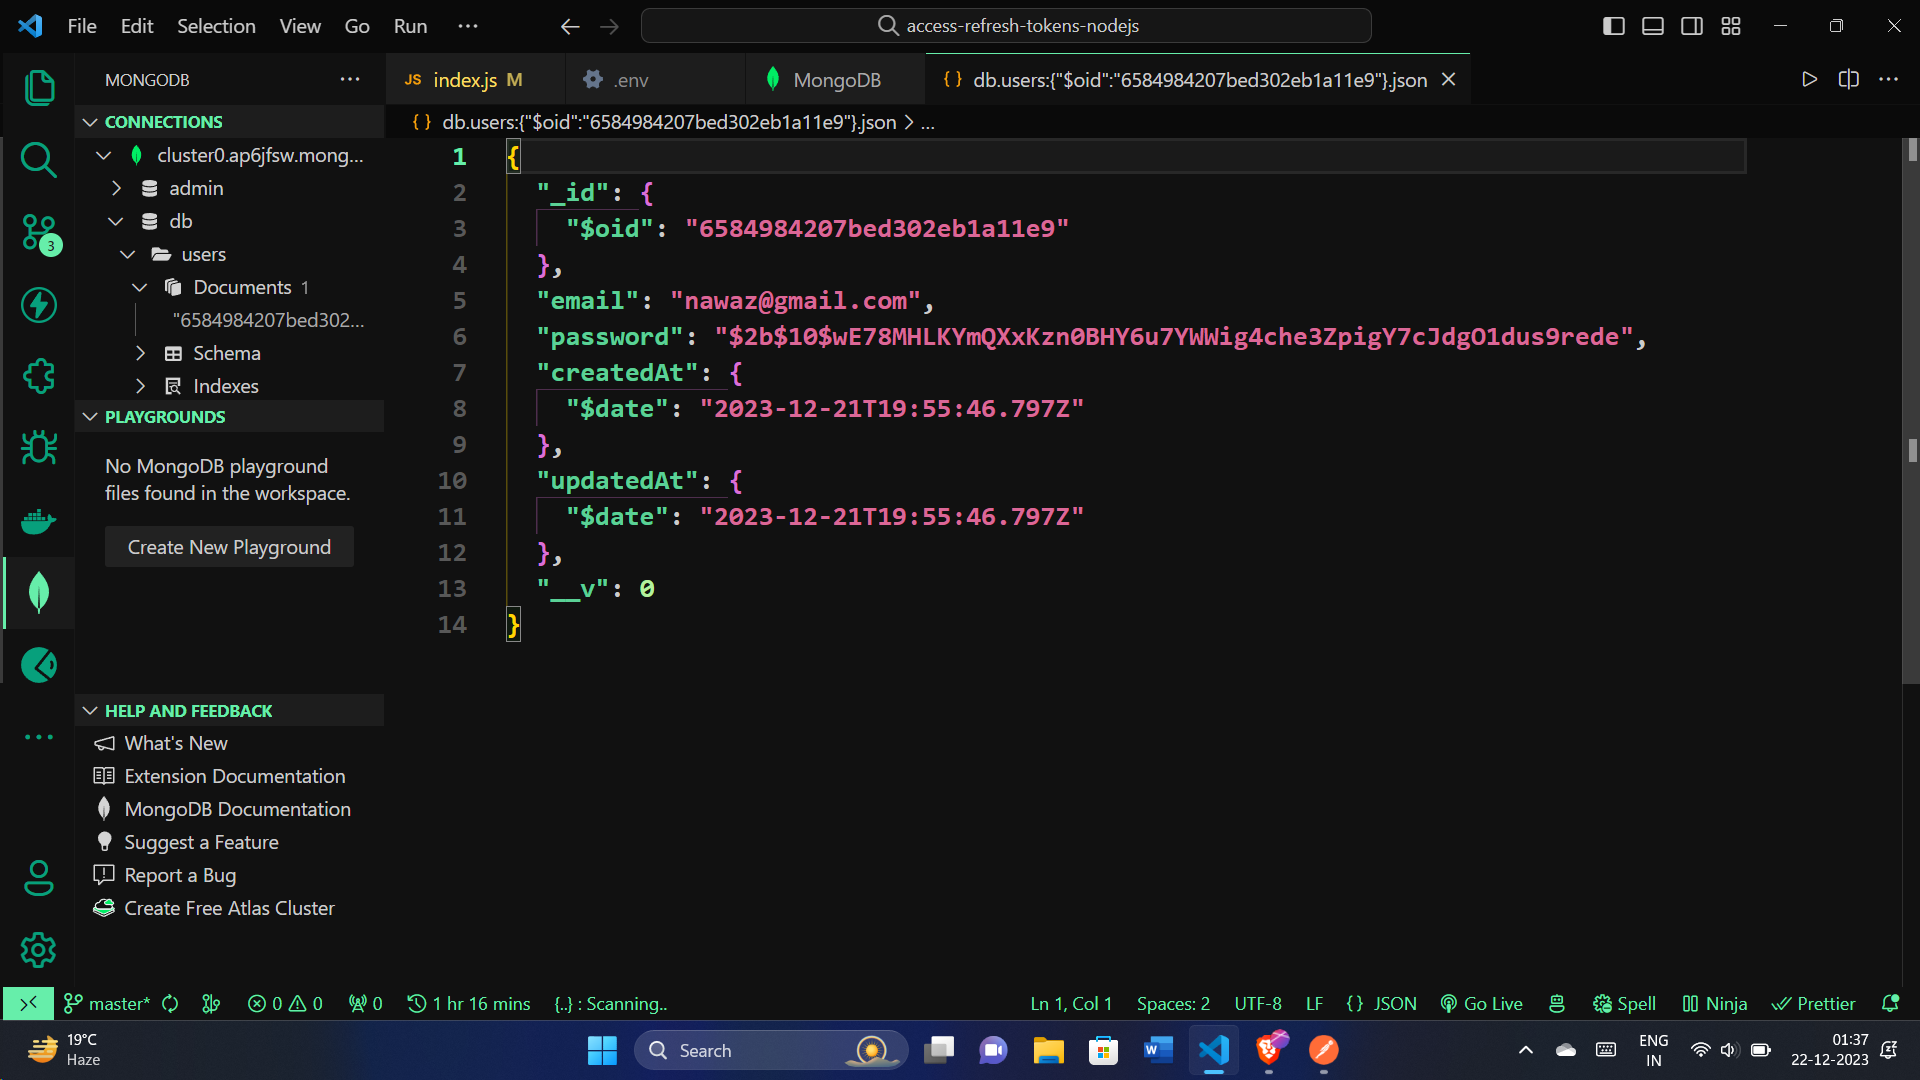
We can also check in the DB, a new user document will be created.
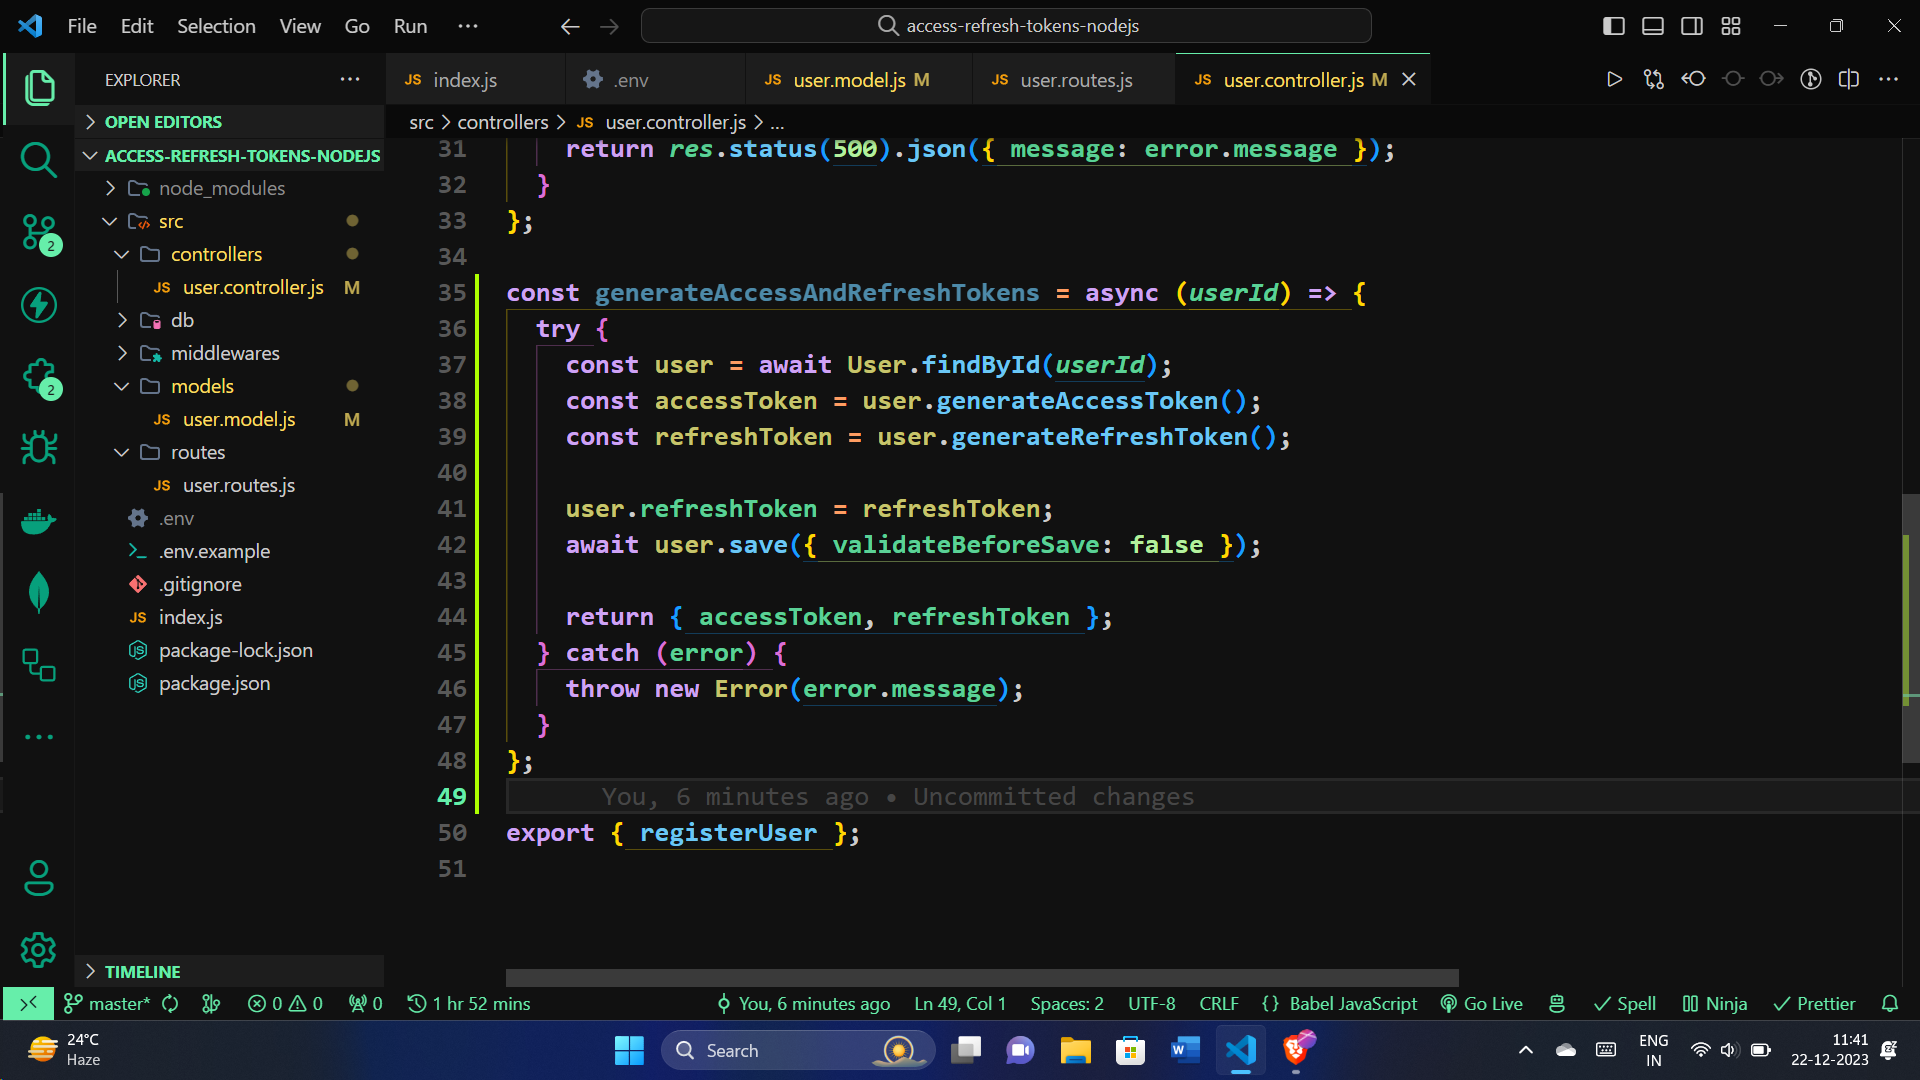
Generating Access and Refresh Tokens
We'll create a function generateAccessAndRefreshTokens. This function takes a userId as input, retrieves the user from the database, and generates both access and refresh tokens. Let's break it down:
const generateAccessAndRefreshTokens = async (userId) => {
  try {
    // Find the user by ID in the database
    const user = await User.findById(userId);

    // Generate an access token and a refresh token
    const accessToken = user.generateAccessToken();
    const refreshToken = user.generateRefreshToken();

    // Save the refresh token to the user in the database
    user.refreshToken = refreshToken;
    await user.save({ validateBeforeSave: false });

    // Return the generated tokens
    return { accessToken, refreshToken };
  } catch (error) {
    // Handle any errors that occur during the process
    throw new Error(error.message);
  }
};
This function is a crucial part of the login process, where successful authentication results in the generation of new tokens for the user. It ensures a smooth and secure flow for handling user sessions in our Node.js application.
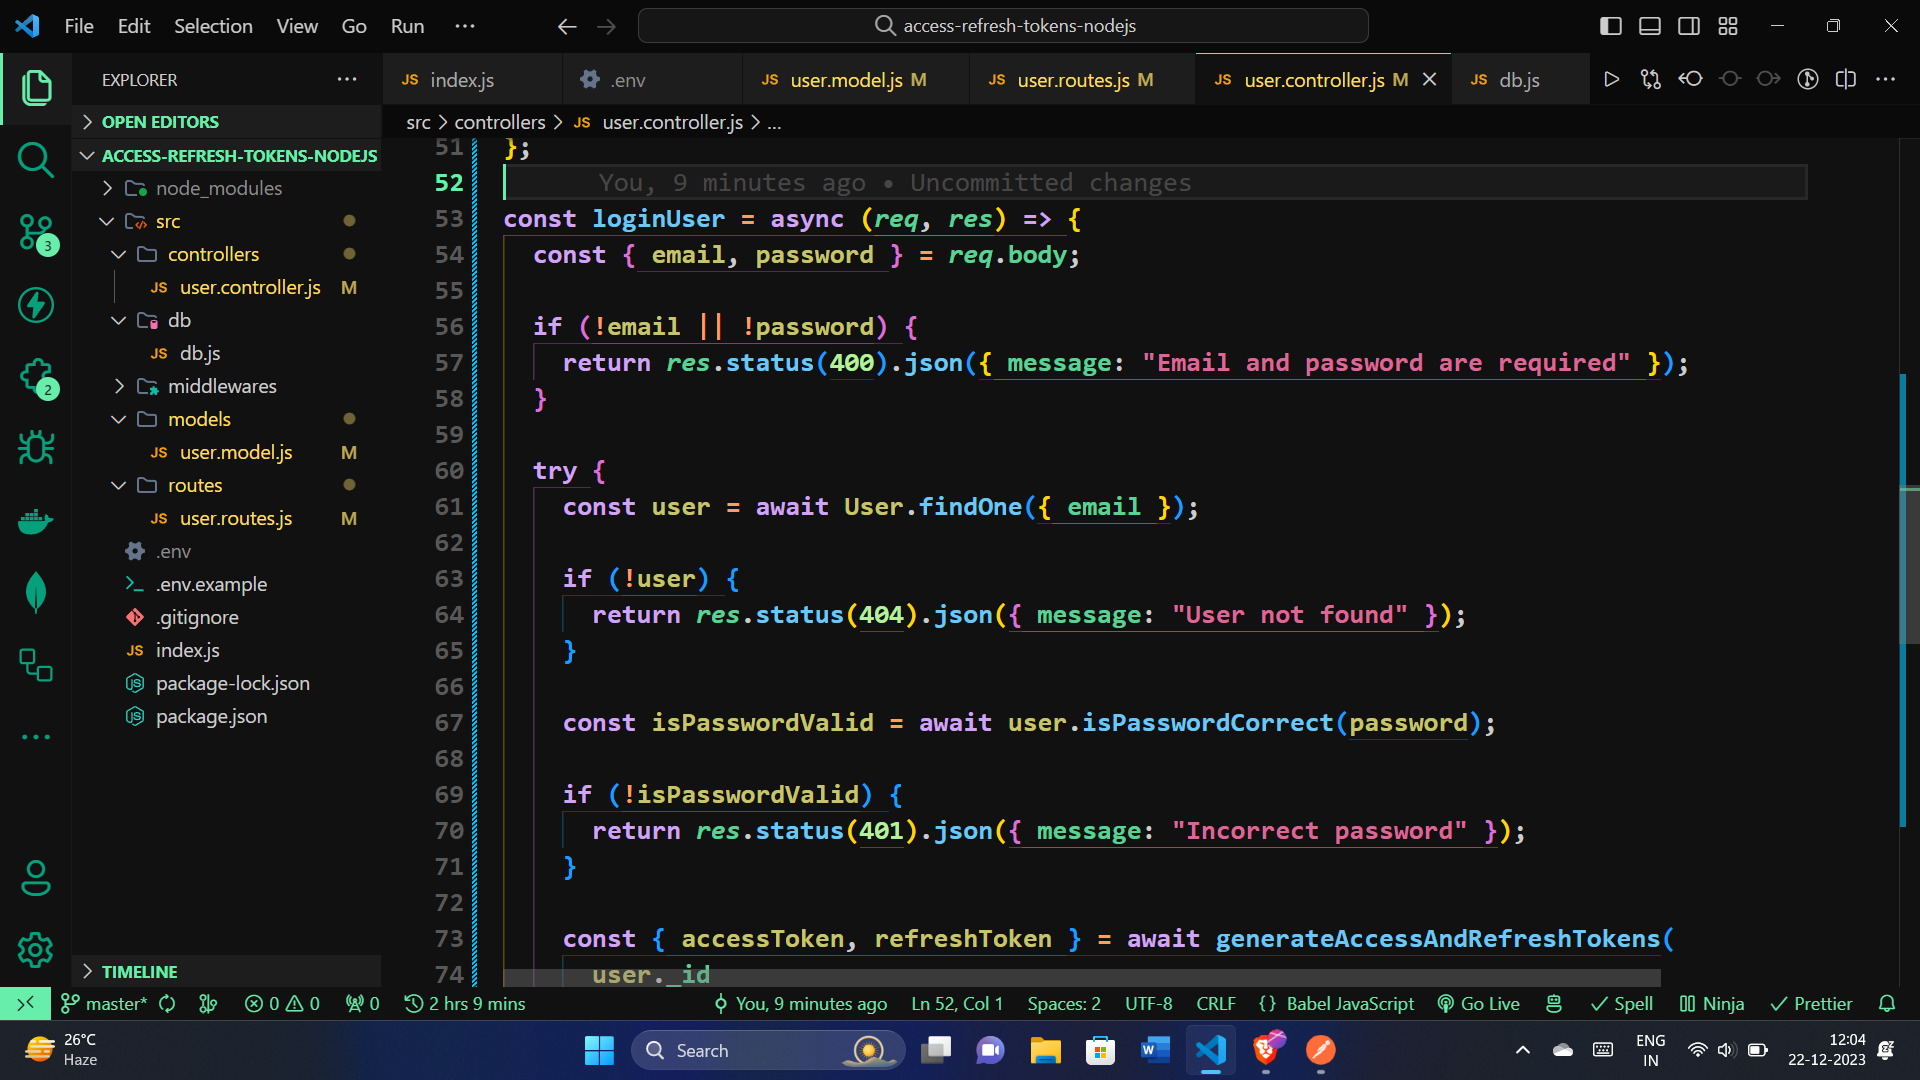
User Login Functionality:
Let's delve into the implementation of the loginUser function. This function handles user login by verifying provided credentials, generating access and refresh tokens upon successful authentication, and setting cookies for secure and seamless session management.
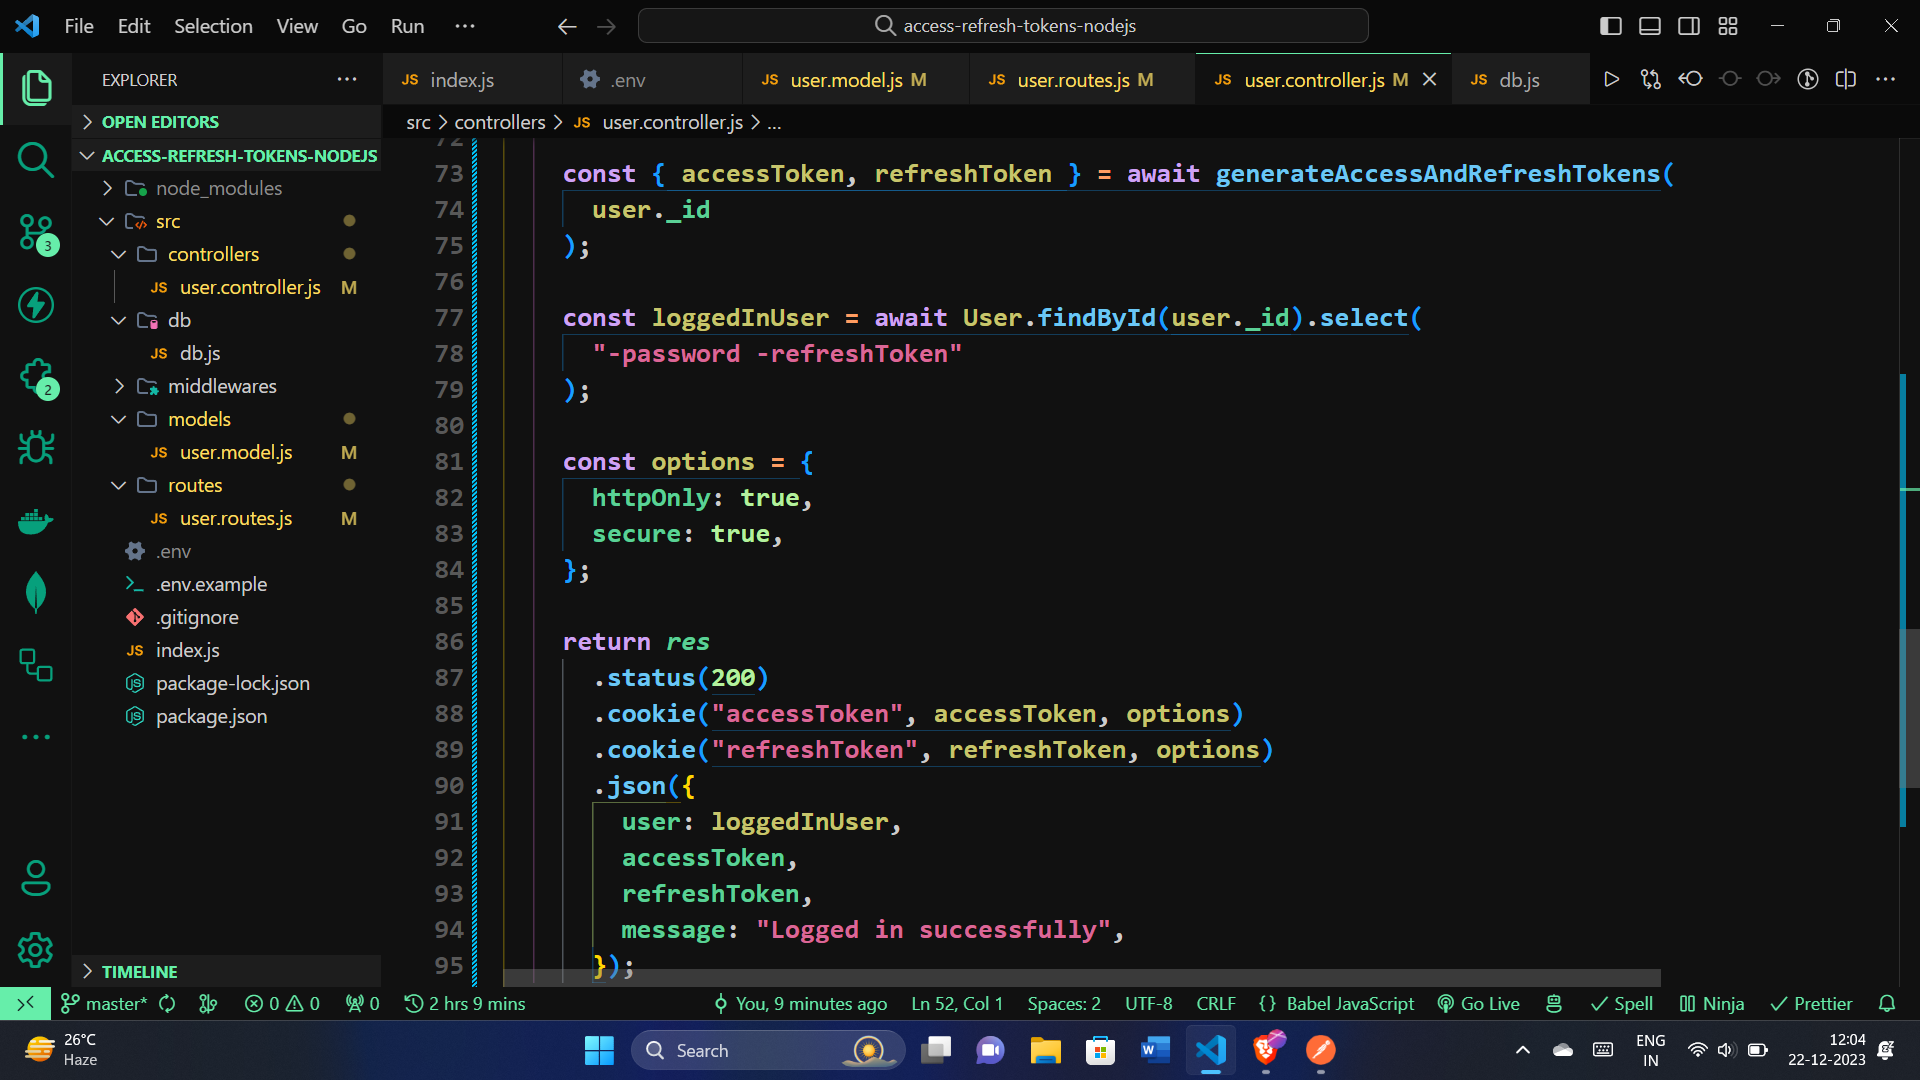
const loginUser = async (req, res) => {
  const { email, password } = req.body;

  // Validate email and password presence
  if (!email || !password) {
    return res.status(400).json({ message: "Email and password are required" });
  }

  try {
    // Find the user by email in the database
    const user = await User.findOne({ email });

    // Check if the user exists
    if (!user) {
      return res.status(404).json({ message: "User not found" });
    }

    // Verify the correctness of the provided password
    const isPasswordValid = await user.isPasswordCorrect(password);

    // Handle incorrect password
    if (!isPasswordValid) {
      return res.status(401).json({ message: "Incorrect password" });
    }

    // Generate access and refresh tokens
    const { accessToken, refreshToken } = await generateAccessAndRefreshTokens(
      user._id
    );

    // Retrieve the logged-in user excluding sensitive information
    const loggedInUser = await User.findById(user._id).select(
      "-password -refreshToken"
    );

    // Set options for cookies
    const options = {
      httpOnly: true,
      secure: true, // Enable in a production environment with HTTPS
    };

    // Set cookies with the generated tokens
    return res
      .status(200)
      .cookie("accessToken", accessToken, options)
      .cookie("refreshToken", refreshToken, options)
      .json({
        user: loggedInUser,
        accessToken,
        refreshToken,
        message: "Logged in successfully",
      });
  } catch (error) {
    // Handle any errors that occur during the process
    return res.status(500).json({ message: error.message });
  }
};
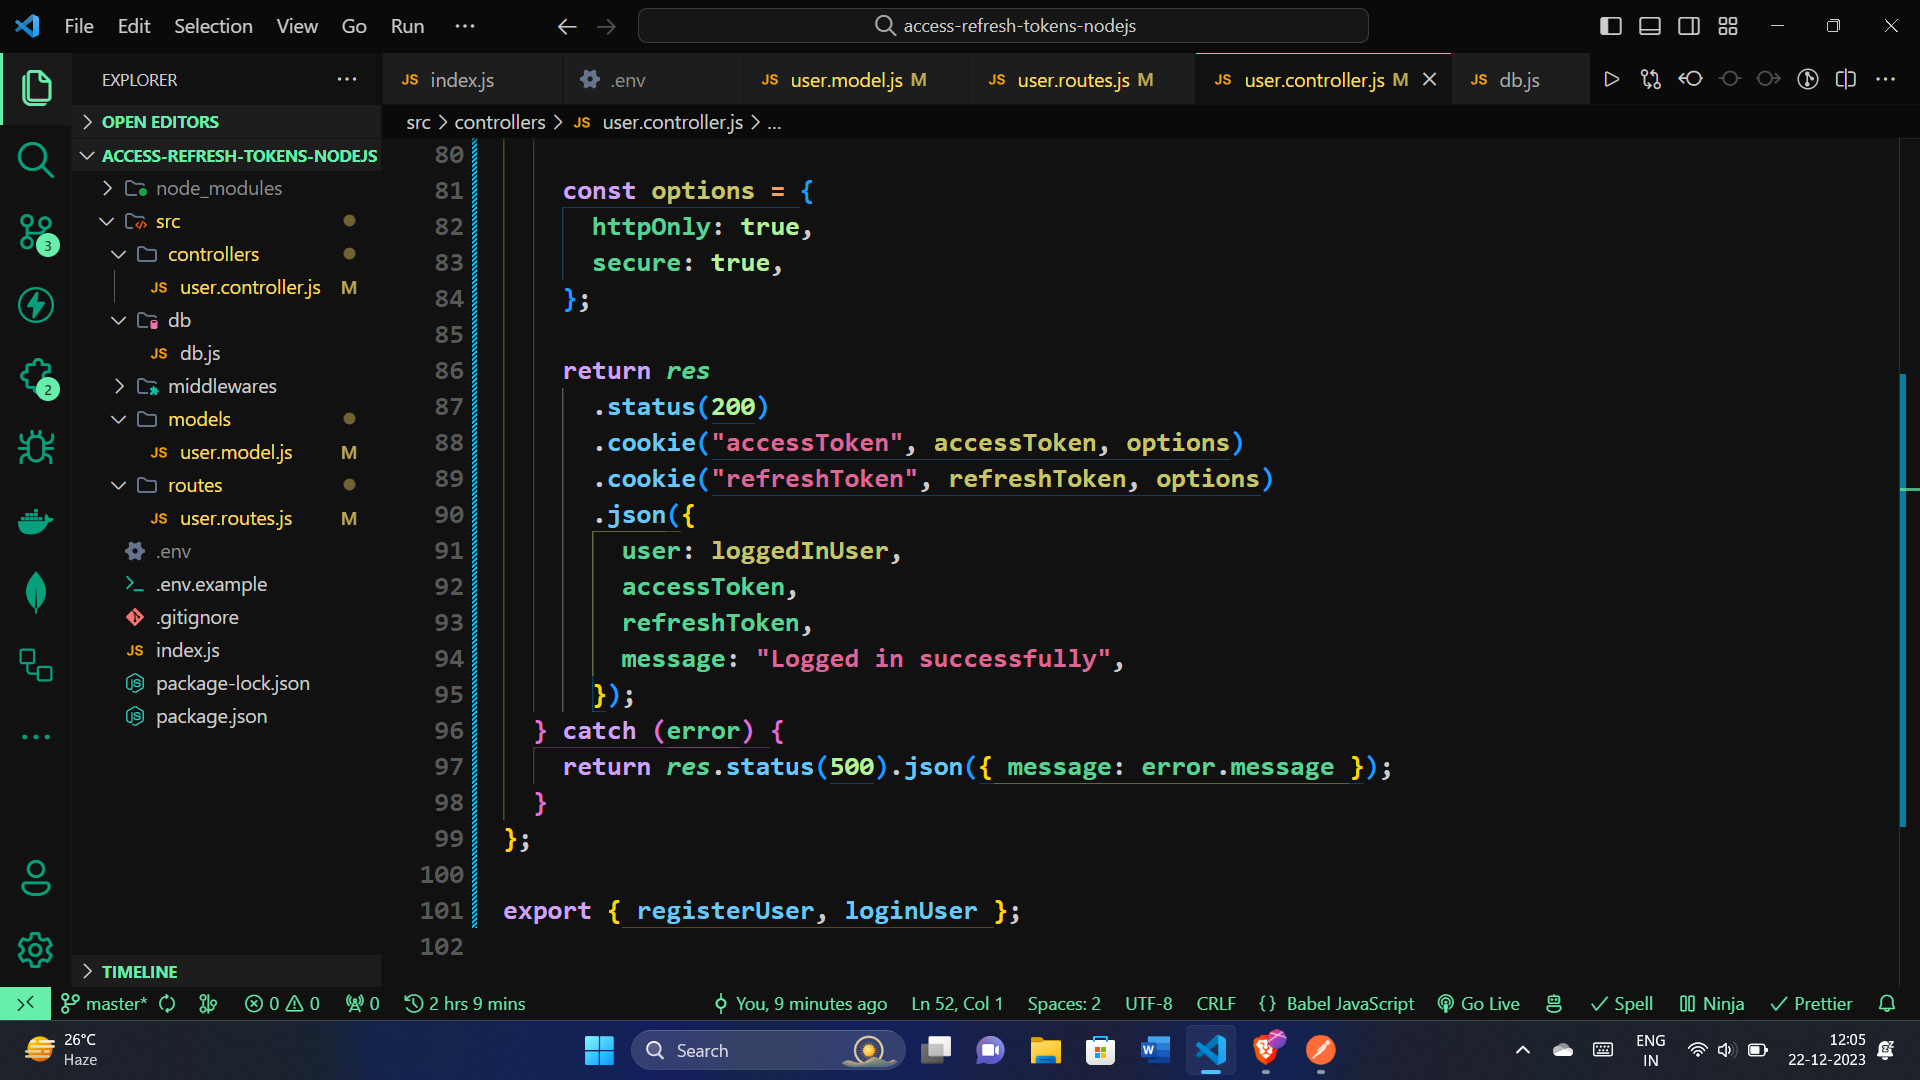
Let's integrate the loginUser function into the user routes by adding a route for user login in the user.routes.js file. Here's the updated:

router.route("/login").post(loginUser);
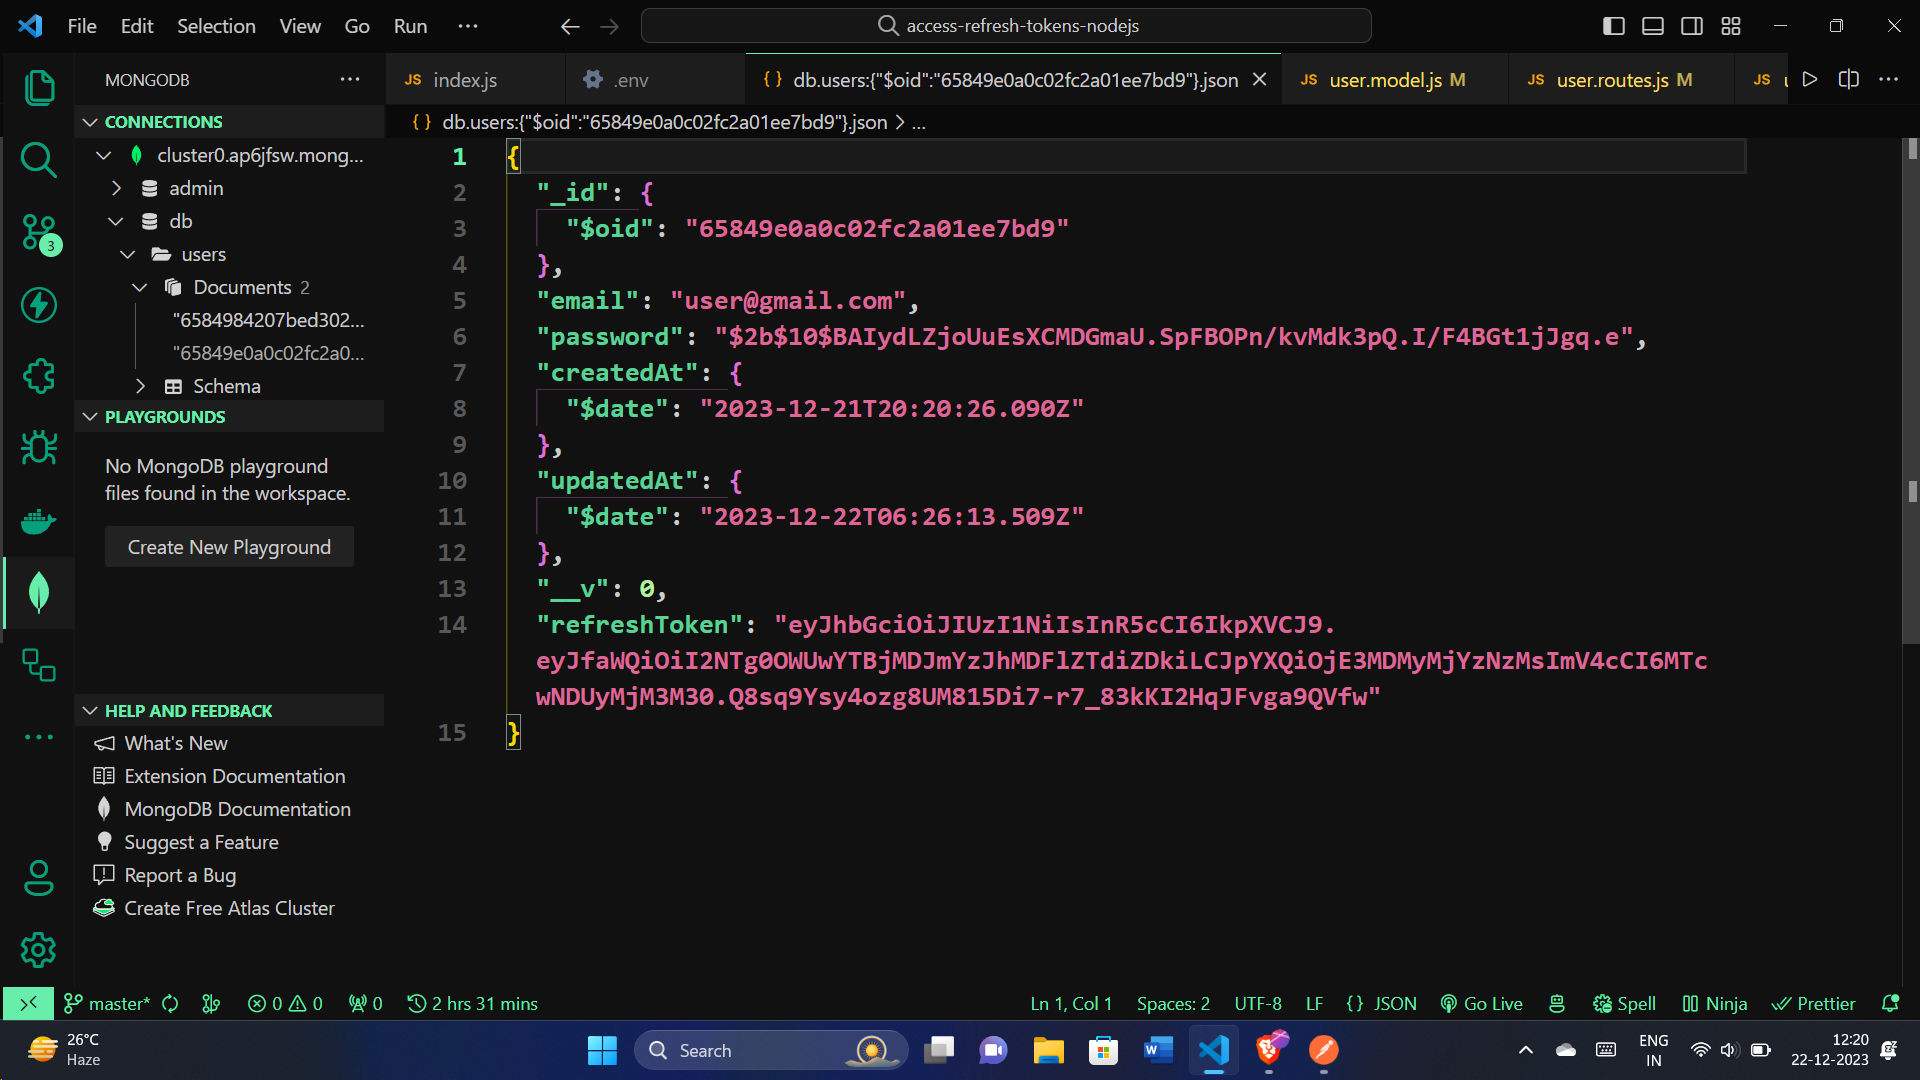
Testing with Postman:

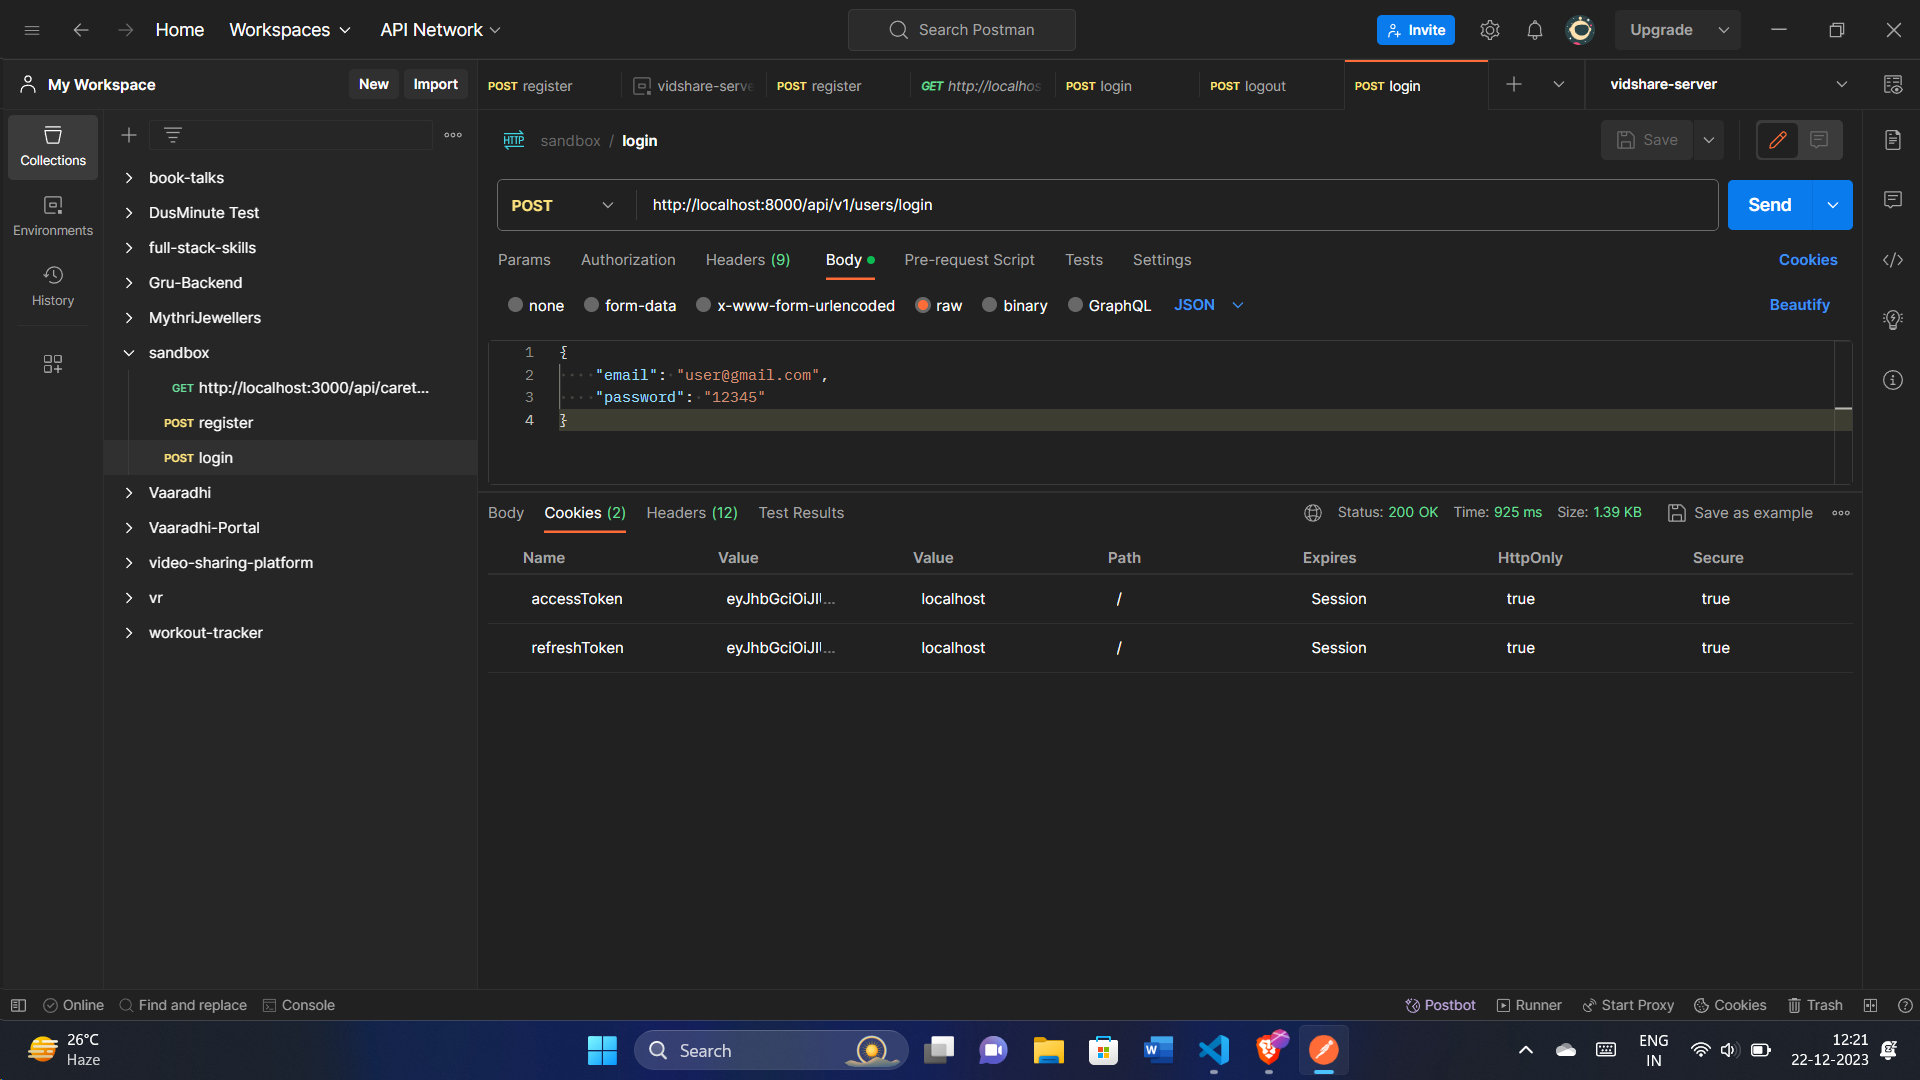
We can also check in the DB, refreshToken is added:
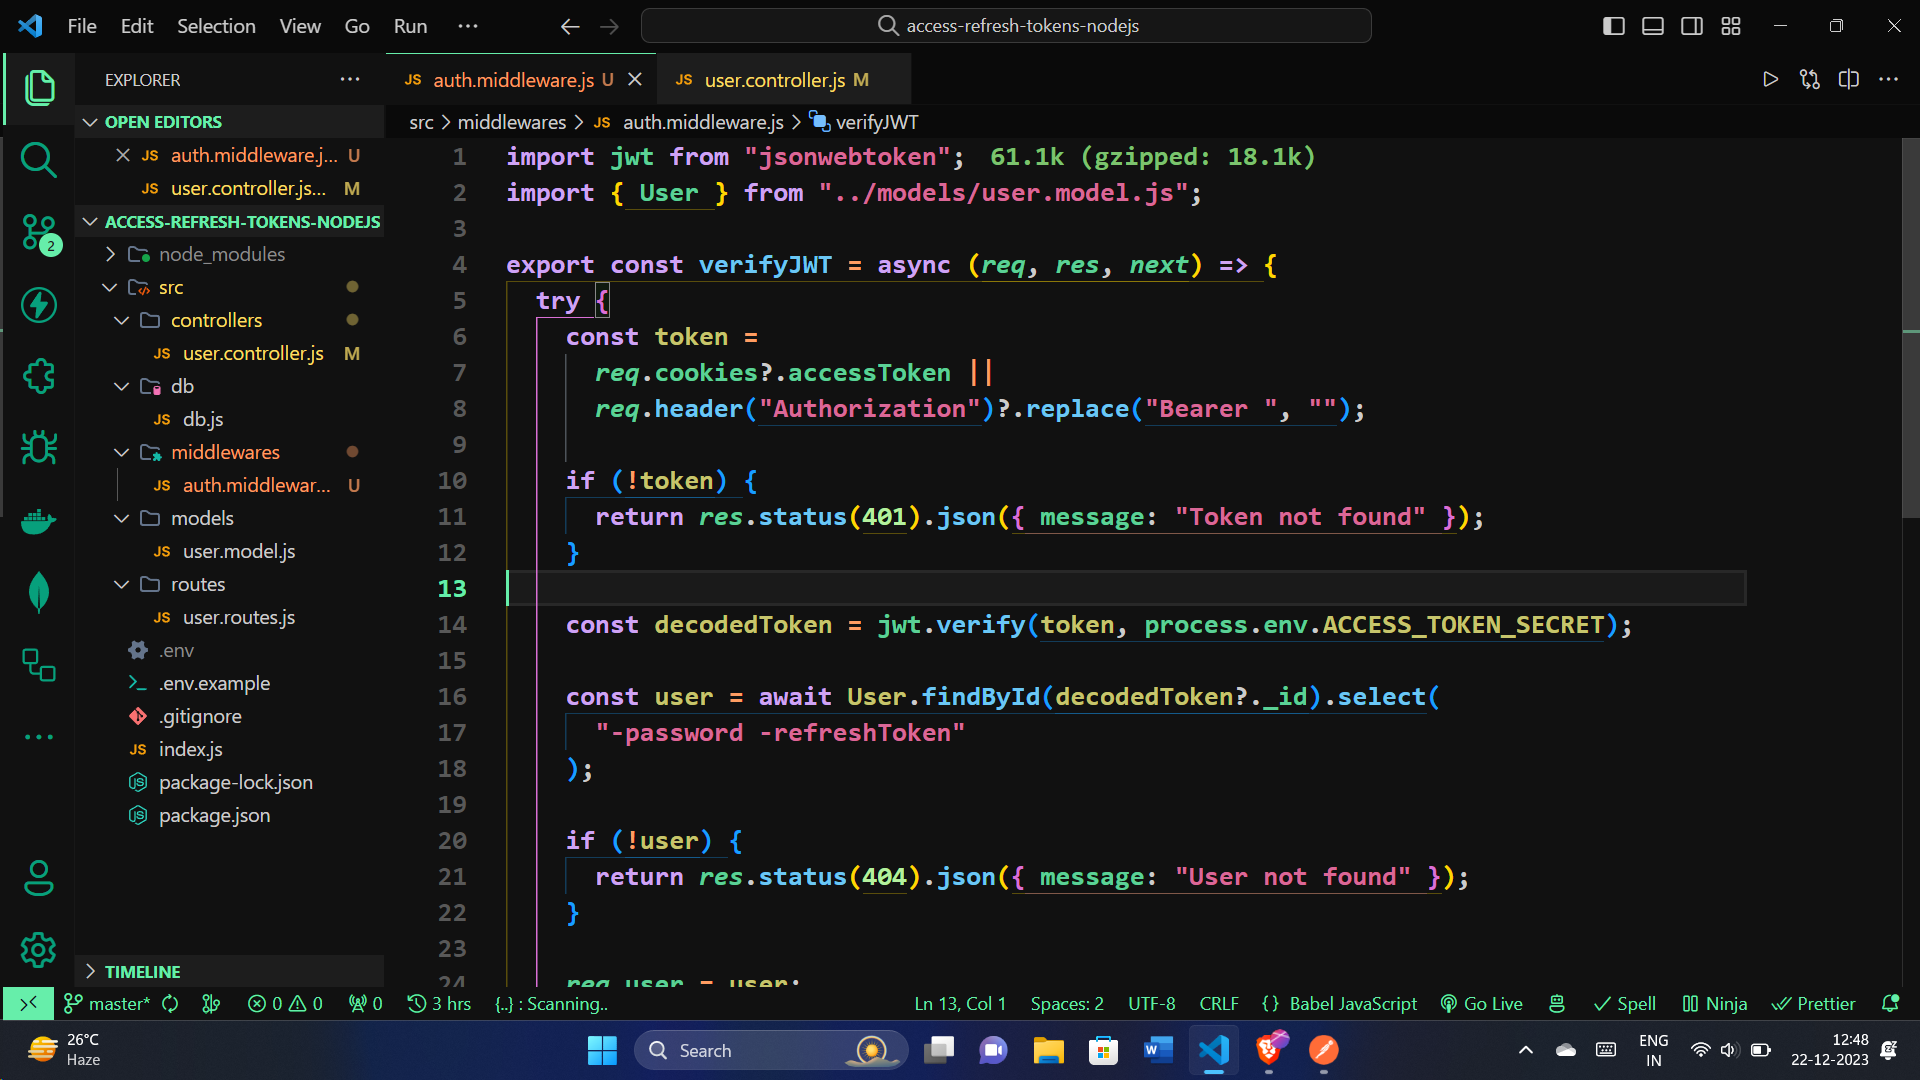
Authentication Middleware
In our Node.js backend, we've set up an important layer of protection known as authentication middleware, specifically verifyJWT. This ensures that only users with proper credentials can access certain parts of our application. Let's break down why we use it and how it keeps our system secure:
import jwt from "jsonwebtoken";
import { User } from "../models/user.model.js";

export const verifyJWT = async (req, res, next) => {
  try {
    // Look for the token in cookies or headers
    const token =
      req.cookies?.accessToken ||
      req.header("Authorization")?.replace("Bearer ", "");

    // If there's no token, deny access with a 401 Unauthorized status
    if (!token) {
      return res.status(401).json({ message: "Token not found" });
    }

    // Check if the token is valid using a secret key
    const decodedToken = jwt.verify(token, process.env.ACCESS_TOKEN_SECRET);

    // Get the user linked to the token
    const user = await User.findById(decodedToken?._id).select(
      "-password -refreshToken"
    );

    // If the user isn't found, deny access with a 404 Not Found status
    if (!user) {
      return res.status(404).json({ message: "User not found" });
    }

    // Attach user info to the request for further use
    req.user = user;
    next();
  } catch (error) {
    // Handle any errors during token verification with a 500 Internal Server Error status
    return res.status(500).json({ message: error.message });
  }
};
Why Use Authentication Middleware:
Securing Access: This middleware acts like a guard, ensuring that only users with valid credentials can enter certain parts of our application.
Log Out Security: When a user logs out, the absence of a valid access token ensures that unauthorized users can't access protected areas.
Token Refresh: To provide a smooth user experience, the middleware helps refresh access tokens, letting users stay logged in without needing to log in repeatedly.
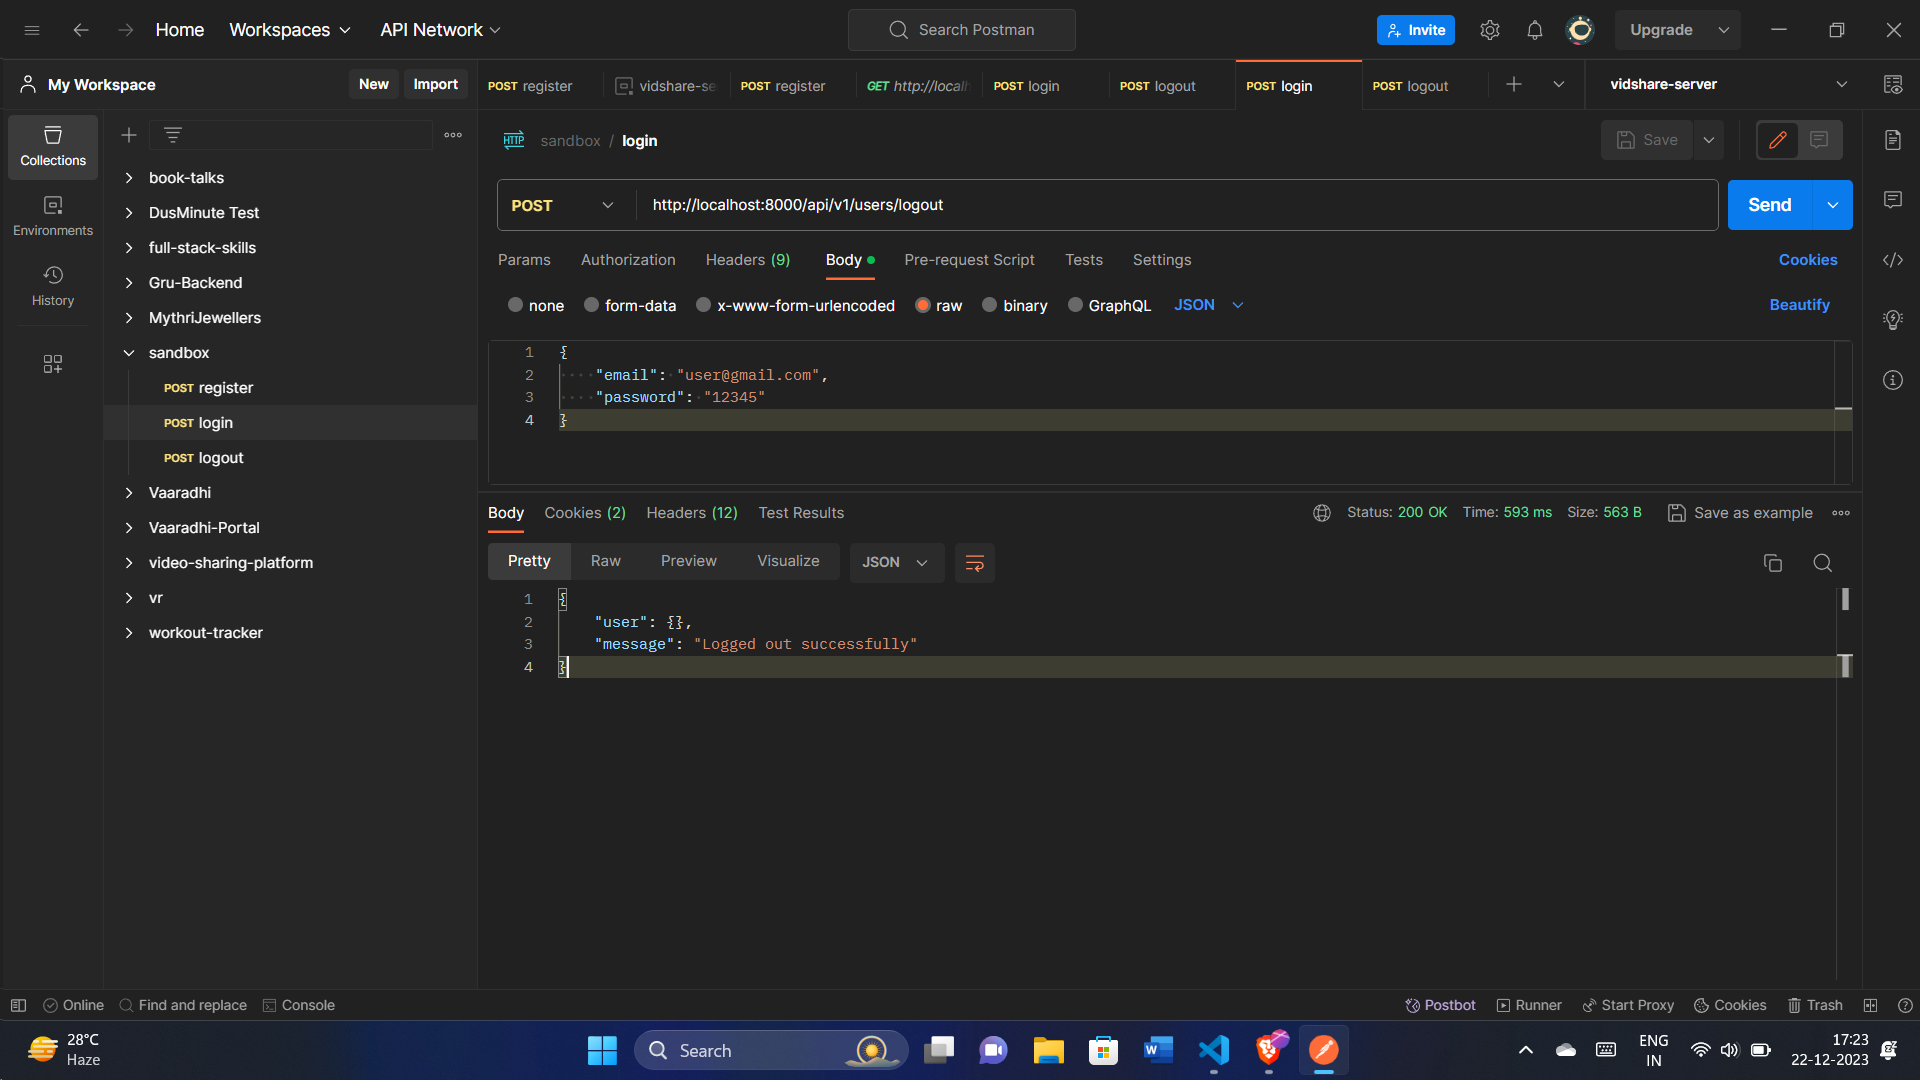
Logging Out Users Securely:
When users decide to log out, we want to make sure it's a secure process. The logoutUser function takes care of this, updating the user's information to remove the refresh token. Let's explore how it ensures a safe logout:

const logoutUser = async (req, res) => {
  // Remove the refresh token from the user's information
  await User.findByIdAndUpdate(
    req.user._id,
    {
      $set: { refreshToken: undefined },
    },
    { new: true }
  );

  // Set options for cookies
  const options = {
    httpOnly: true,
    secure: true, // Enable in a production environment with HTTPS
  };

  // Clear the access and refresh tokens in cookies
  return res
    .status(200)
    .cookie("accessToken", options)
    .cookie("refreshToken", options)
    .json({ user: {}, message: "Logged out successfully" });
};
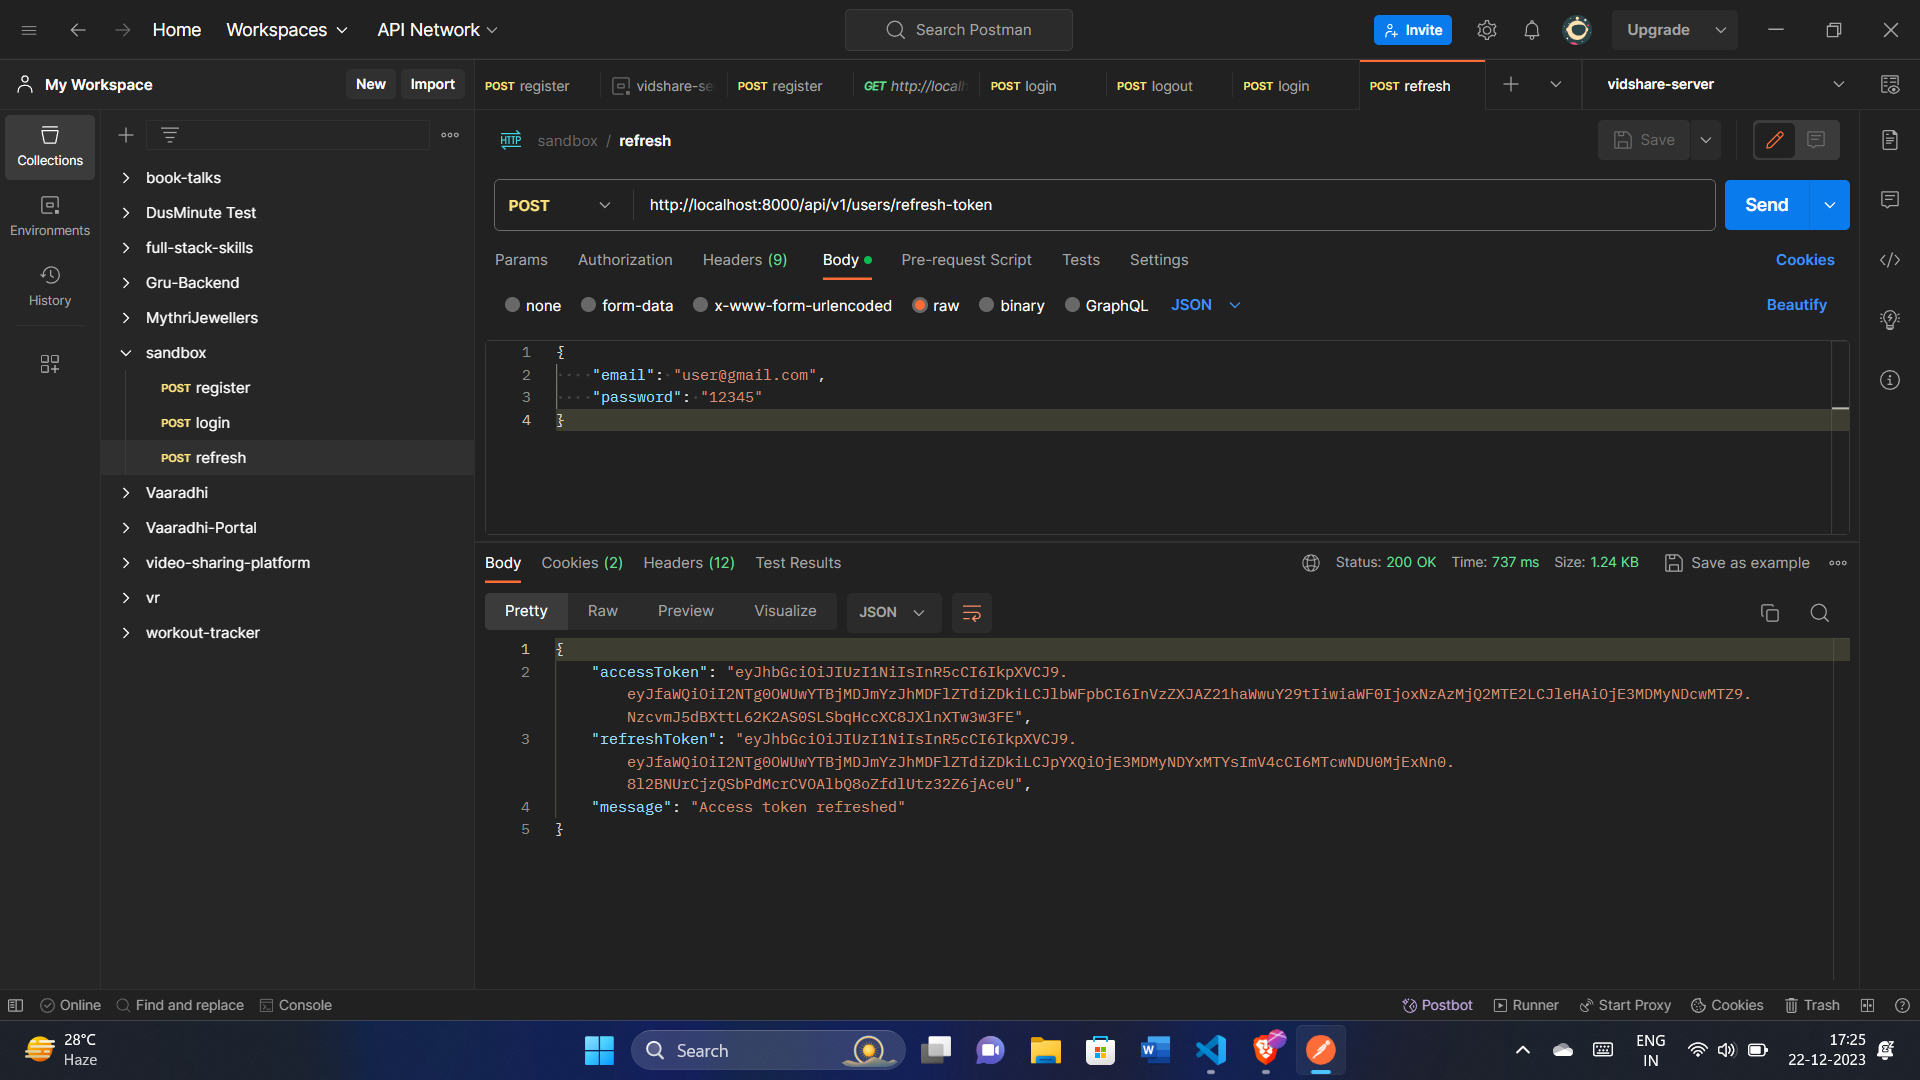
Refreshing Access Tokens
To keep the user experience seamless and uninterrupted, we have the refreshAccessToken function. This function is responsible for refreshing the access token using a valid refresh token. Here's how it ensures a smooth token refresh:


const refreshAccessToken = async (req, res) => {
  // Retrieve the refresh token from cookies or request body
  const incomingRefreshToken =
    req.cookies.refreshToken || req.body.refreshToken;

  // If no refresh token is present, deny access with a 401 Unauthorized status
  if (!incomingRefreshToken) {
    return res.status(401).json({ message: "Refresh token not found" });
  }

  try {
    // Verify the incoming refresh token using the secret key
    const decodedToken = jwt.verify(
      incomingRefreshToken,
      process.env.REFRESH_TOKEN_SECRET
    );

    // Find the user associated with the refresh token
    const user = await User.findById(decodedToken?._id);

    // If the user isn't found, deny access with a 404 Not Found status
    if (!user) {
      return res.status(404).json({ message: "User not found" });
    }

    // If the stored refresh token doesn't match the incoming one, deny access with a 401 Unauthorized status
    if (user?.refreshToken !== incomingRefreshToken) {
      return res.status(401).json({ message: "Refresh token is incorrect" });
    }

    // Set options for cookies
    const options = {
      httpOnly: true,
      secure: true, // Enable in a production environment with HTTPS
    };

    // Generate new access and refresh tokens for the user
    const { accessToken, refreshToken } = await generateAccessAndRefreshTokens(
      user._id
    );

    // Set the new tokens in cookies
    return res
      .status(200)
      .cookie("accessToken", accessToken, options)
      .cookie("refreshToken", refreshToken, options)
      .json({ accessToken, refreshToken, message: "Access token refreshed" });
  } catch (error) {
    // Handle any errors during token refresh with a 500 Internal Server Error status
    return res.status(500).json({ message: error.message });
  }
};
When users want to log out, we make sure it's done securely by removing sensitive information. The logoutUser function handles this process, ensuring a clean logout experience.
For maintaining uninterrupted user sessions, the refreshAccessToken function comes into play. It checks and verifies a refresh token, then provides the user with fresh access and refresh tokens, ensuring a smooth continuation of their session.
Both these functions contribute to a secure and seamless user authentication system, showcasing our commitment to user privacy and a positive user experience.
Secured Routes for Logging Out and Token Refresh:
In our application, certain routes are secured, requiring users to be authenticated. Here, we define two important secured routes, /logout for securely logging out and /refresh-token for refreshing access tokens. Let's integrate these routes into our application:
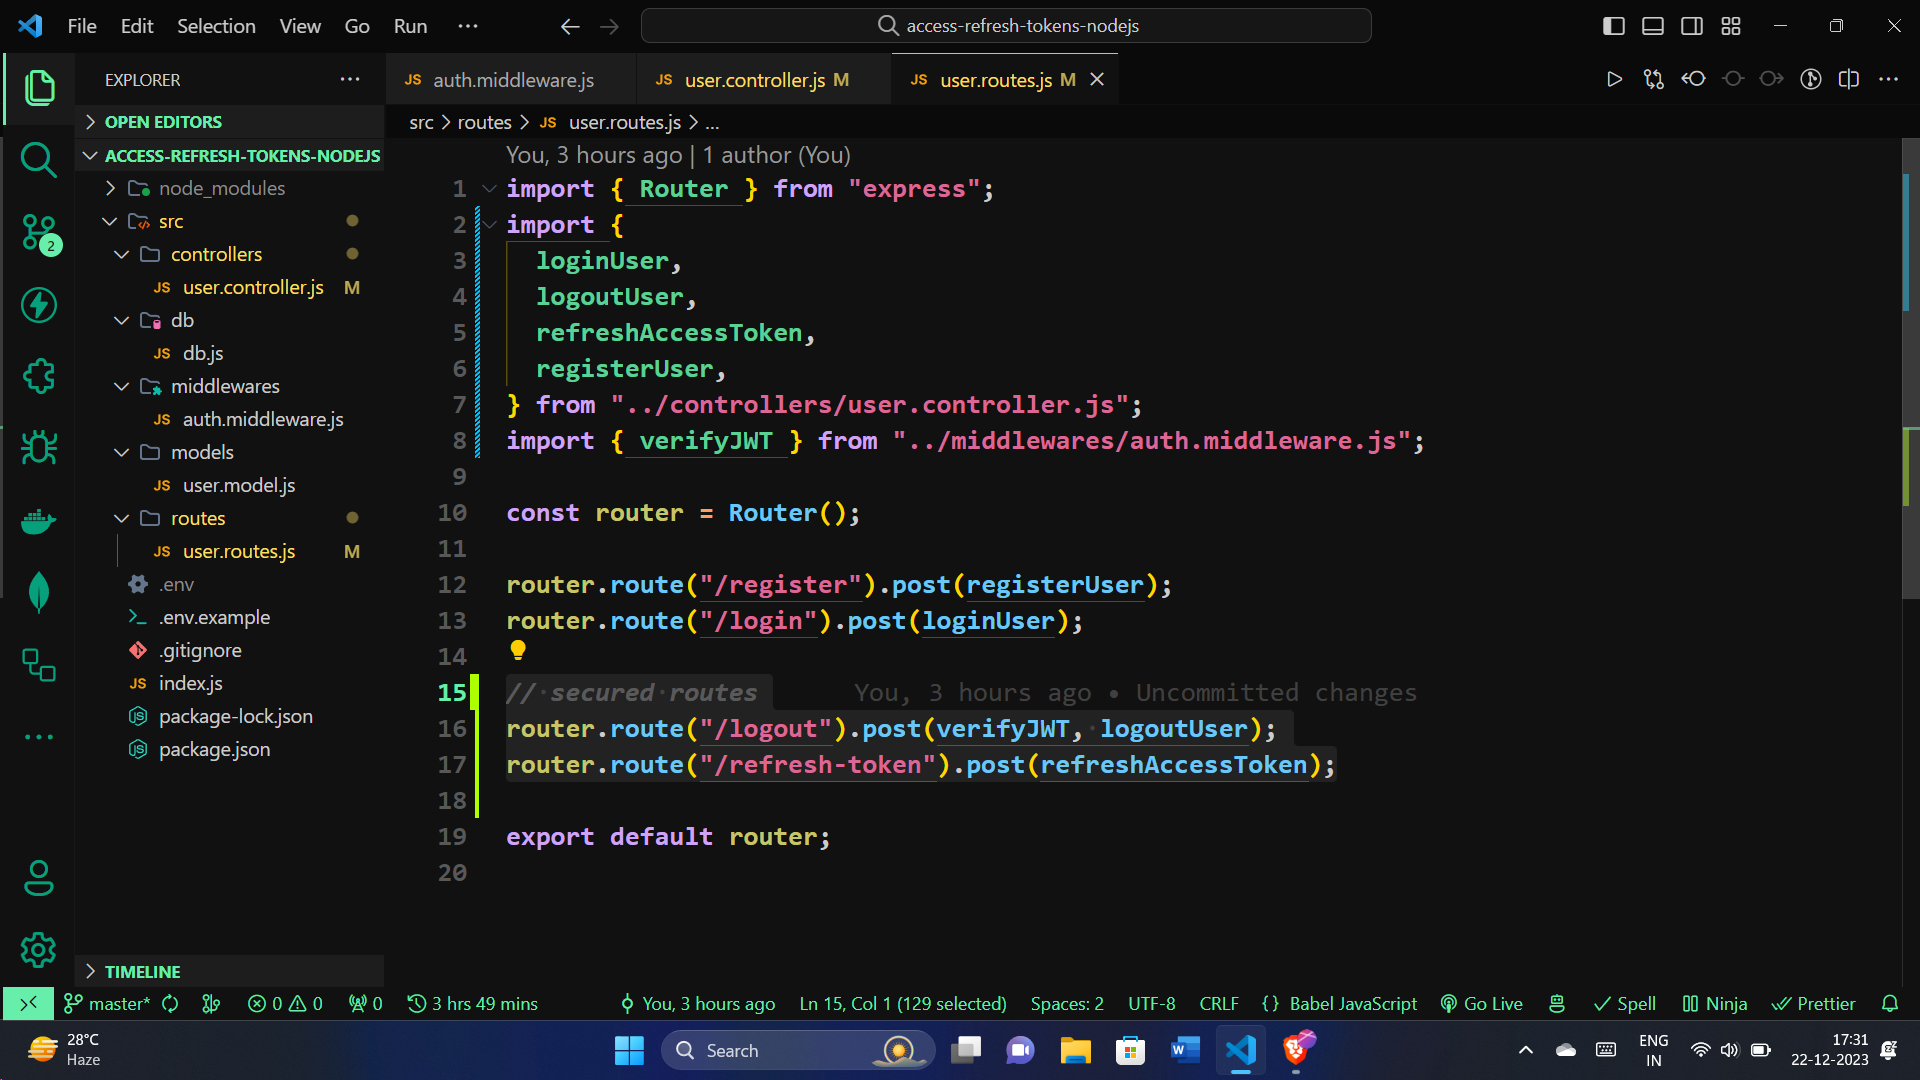
// secured routes
router.route("/logout").post(verifyJWT, logoutUser);
router.route("/refresh-token").post(refreshAccessToken);
Testing with Postman:
Conclusion
As we conclude this journey, we've equipped our Node.js backend with a strong foundation for user authentication.
All the code is available in the GitHub repository: https://github.com/shaikahmadnawaz/access-refresh-tokens-nodejs
I highly recommend watching Hitesh Choudhary's insightful video on this topic: https://youtu.be/L2_gIrDxCes?si=PtUNdWzdEL_S9-RV, This article is inspired by this video.
🧑💻 My portfolio: https://shaikahmadnawaz.vercel.app
📱 Connect on Social Media:
LinkedIn: shaikahmadnawaz
Twitter: @shaikahmadnawaz


